即將邁入2019,回顧一下2018 前10名最受喜愛的snap套件是哪些呢?
剛看了一下敝公司的官方網頁,以下有Top10的排行榜唷~ :D
https://blog.ubuntu.com/2018/12/27/top-snaps-in-2018
不過說真的,我個人蠻常用的Skype, mailspring, simplenote現在都用snap來安裝,並且會自動定時更新,超方便的呀~
不知道何時會有line for snap?
Friday, December 28, 2018

Wednesday, September 19, 2018
How can I setup an IPv6 router via radvd on Ubuntu 18.04 LTS?
What's radvd?
Router advertisement daemon.
Reference:
https://zh.wikipedia.org/wiki/Radvd
http://www.litech.org/radvd/
一般來說 IPv6 Client決定Global IPv6的方式有兩種,分別是Stateless與Stateful,預設radvd是採用stateless IPv6,不過透過更改某個參數(M flag),就可以轉換成stateful,但是此時網路上必須有對應的DHCPv6 server來負責管理與分配IPv6 address。
網路上可以找到很多先進寫的資料關於Stateless與Stateful的差異,我也就不班門弄斧了,廢話不多說,直接進入主題,如何架設radvd在Canonical/Ubuntu 18.04 LTS。
Steps:
Step1. Install radvd package.
以上一個簡單的IPv6 stateless的Router已經架設完成,IPv6 client現在自己可以搭配prefix自動產生host ID。
Router advertisement daemon.
Reference:
https://zh.wikipedia.org/wiki/Radvd
http://www.litech.org/radvd/
一般來說 IPv6 Client決定Global IPv6的方式有兩種,分別是Stateless與Stateful,預設radvd是採用stateless IPv6,不過透過更改某個參數(M flag),就可以轉換成stateful,但是此時網路上必須有對應的DHCPv6 server來負責管理與分配IPv6 address。
網路上可以找到很多先進寫的資料關於Stateless與Stateful的差異,我也就不班門弄斧了,廢話不多說,直接進入主題,如何架設radvd在Canonical/Ubuntu 18.04 LTS。
Steps:
Step1. Install radvd package.
$ sudo apt-get install radvdStep2. Copy example file of radvid.conf from /usr/share/doc/radvd/examples/ to /etc.
$ sudo cp /usr/share/doc/radvd/examples/radvd.conf.example /etc/radvd.conf
Step3. Open/Edit radvd.conf
根據你的需求,去配置相關的參數,最重要的應該是prefix,更多詳細的參數可以參考man page。
https://www.systutorials.com/docs/linux/man/5-radvd.conf/Step4. Restart radvd
$ sudo systemctl restart radvd; sudo systemctl enable radvd
以上一個簡單的IPv6 stateless的Router已經架設完成,IPv6 client現在自己可以搭配prefix自動產生host ID。
Wednesday, August 15, 2018
How can I configure Ubuntu 16 to start teamviewer automatically?
Steps:
1. Opened /etc/init.d/rc.local
2. Added teamviewer's command and parameter below in file rc.local:
4. Examine if teamviewer daemon can work as expected:
1. Opened /etc/init.d/rc.local
$ sudo vi /etc/init.d/rc.local
2. Added teamviewer's command and parameter below in file rc.local:
teamviewer passwd ubuntu3. Restart system
4. Examine if teamviewer daemon can work as expected:
$ systemctl status teamviewerd
● teamviewerd.service - TeamViewer remote control daemon
Loaded: loaded (/etc/systemd/system/teamviewerd.service; enabled; vendor preset: enabled)
Active: active (running) since 三 2018-08-15 11:00:14 CST; 1min 25s ago
Process: 1555 ExecStart=/opt/teamviewer/tv_bin/teamviewerd -d (code=exited, status=0/SUCCESS)
Main PID: 1567 (teamviewerd)
CGroup: /system.slice/teamviewerd.service
└─1567 /opt/teamviewer/tv_bin/teamviewerd -d
$ ps aux | grep -i teamviewer
root 1567 0.3 0.3 1181612 12212 ? Sl 11:00 0:00 /opt/teamviewer/tv_bin/teamviewerd -d
u 1890 0.3 2.2 1990224 88556 ? Sl 11:00 0:00 /opt/teamviewer/tv_bin/TeamViewer
Afterwards, you can remote control host via Partner ID and password which is ubuntu in this example.
Friday, May 04, 2018
How can I create a multiboot USB stick from Linux?
You can refer to https://www.pendrivelinux.com/multiboot-create-a-multiboot-usb-from-linux/
It works for me!
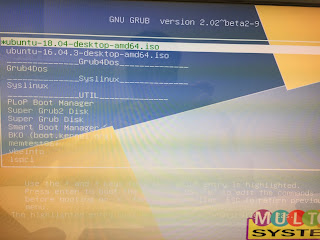
Above you can see that I am able to boot Ubuntu 16.03 as well as 18.04 with one USB stick w/o problem.
But somehow you've to disable security boot in BIOS.
Enjoy~
It works for me!
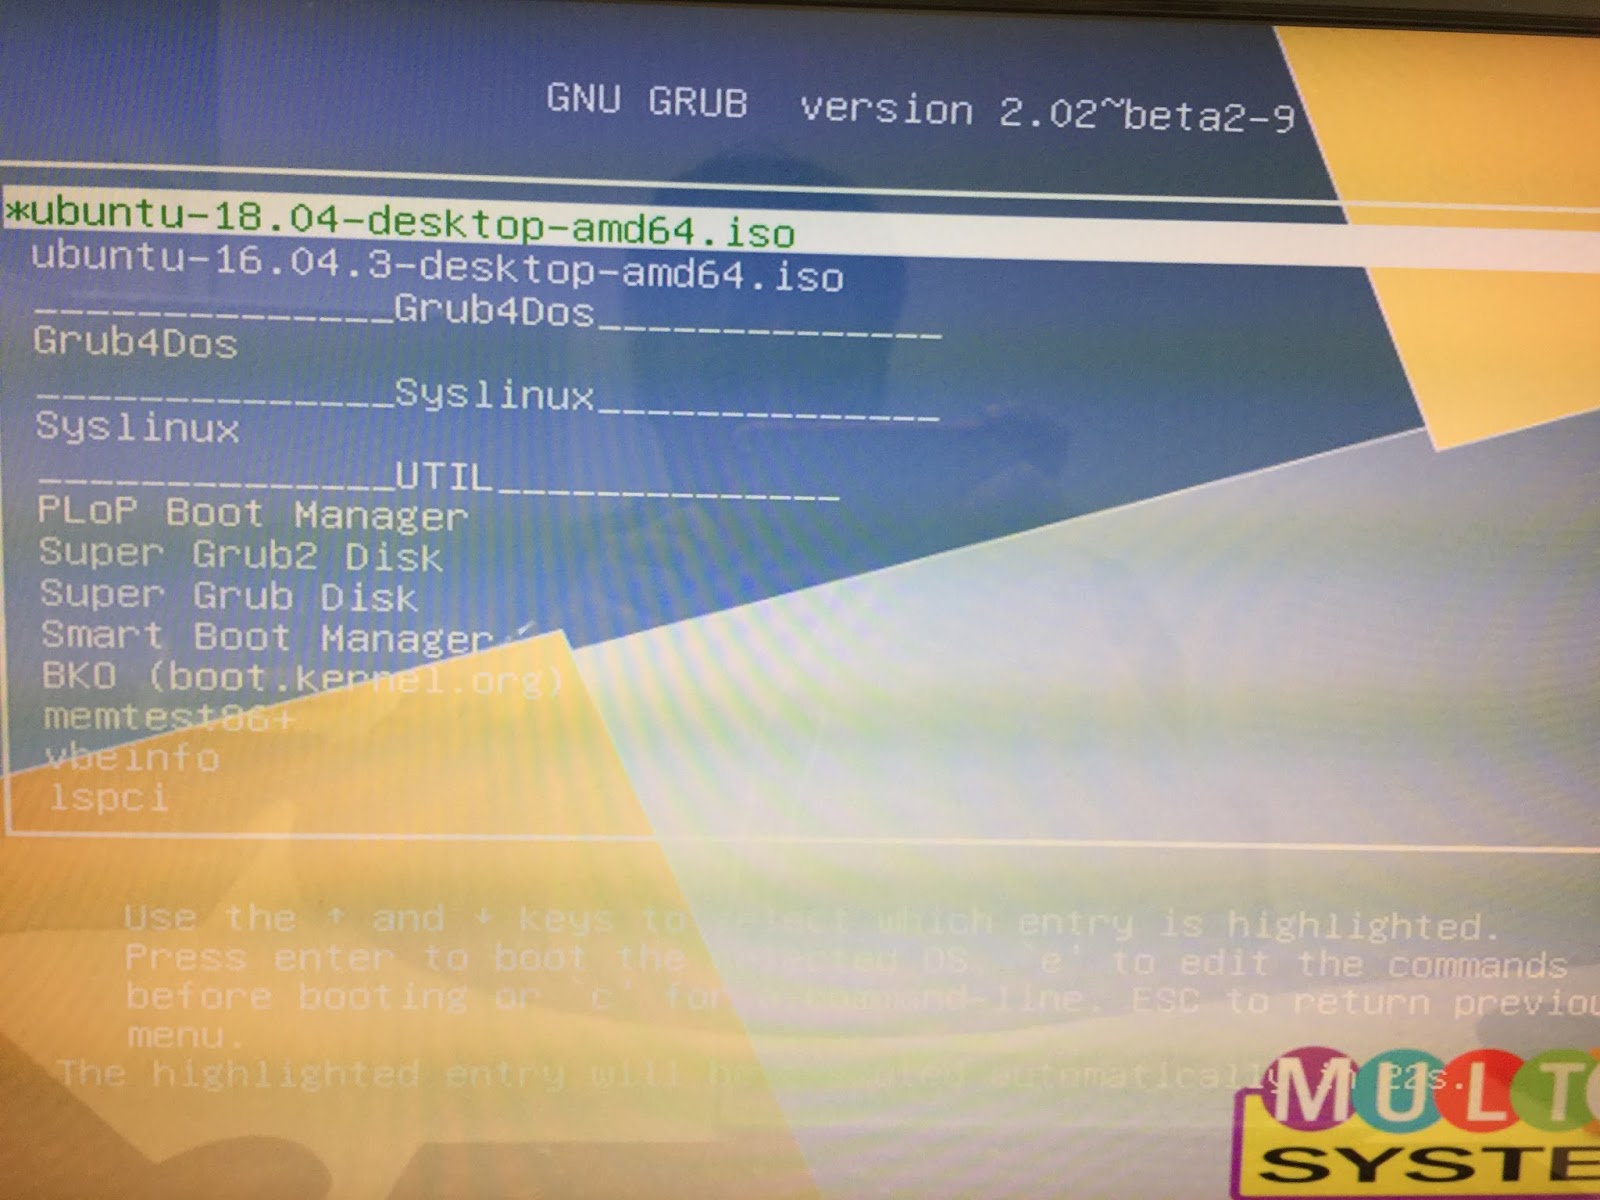
Above you can see that I am able to boot Ubuntu 16.03 as well as 18.04 with one USB stick w/o problem.
But somehow you've to disable security boot in BIOS.
Enjoy~
How can I setup a proxy server in Ubuntu 16.04?
Step1. Install package squid
# sudo apt-get install -y squid
Step2. To setup common proxy settings:
# sudo vi /etc/squid/squid.conf
To add some lines below:
# line 977
acl lan src 192.168.1.0/24
(where 192.168.1.0 means network you would like to allow client to access your proxy server)
# line 1189
http_access allow lan
(Allow lan here)
# line 1602
http_port 3128
(To modify default proxy port if needed)
Step3. Restart squid
# sudo systemctl restart squid
Step4. Examine squid service
# sudo systemctl status squid
● squid.service - LSB: Squid HTTP Proxy version 3.x
Loaded: loaded (/etc/init.d/squid; bad; vendor preset: enabled)
Active: active (running) since 四 2018-04-26 15:24:04 CST; 1min 56s ago
Docs: man:systemd-sysv-generator(8)
Process: 3088 ExecStop=/etc/init.d/squid stop (code=exited, status=0/SUCCESS)
Process: 3119 ExecStart=/etc/init.d/squid start (code=exited, status=0/SUCCESS)
CGroup: /system.slice/squid.service
├─3159 /usr/sbin/squid -YC -f /etc/squid/squid.conf
├─3161 (squid-1) -YC -f /etc/squid/squid.conf
├─3162 (logfile-daemon) /var/log/squid/access.log
└─3163 (pinger)
四 26 15:24:04 uc16-VirtualBox systemd[1]: Starting LSB: Squid HTTP Proxy version 3.x...
四 26 15:24:04 uc16-VirtualBox squid[3119]: * Starting Squid HTTP Proxy squid
四 26 15:24:04 uc16-VirtualBox squid[3159]: Squid Parent: will start 1 kids
四 26 15:24:04 uc16-VirtualBox squid[3119]: ...done.
四 26 15:24:04 uc16-VirtualBox systemd[1]: Started LSB: Squid HTTP Proxy version 3.x.
四 26 15:24:04 uc16-VirtualBox squid[3159]: Squid Parent: (squid-1) process 3161 started
# netstat -tupln | grep 3128
tcp6 0 0 :::3128 :::* LISTEN 3161/(squid-1)
Done ~
In proxy client side:
You can use tcpdump or wireshark to ensure that http request will go to proxy server after you configured http proxy server within browser.
root@server1:~$ sudo tcpdump -n -v -i any port 3128
tcpdump: listening on any, link-type LINUX_SLL (Linux cooked), capture size 262144 bytes
15:29:06.382845 IP (tos 0x0, ttl 64, id 2257, offset 0, flags [DF], proto TCP (6), length 145)
192.168.1.211.40994 > 192.168.1.254.3128: Flags [P.], cksum 0x85a5 (incorrect -> 0x9ba8), seq 670754847:670754940, ack 314235908, win 237, options [nop,nop,TS val 1731217504 ecr 1884649606], length 93
15:29:06.383195 IP (tos 0x0, ttl 64, id 35299, offset 0, flags [DF], proto TCP (6), length 212)
192.168.1.254.3128 > 192.168.1.211.40998: Flags [P.], cksum 0xbf6c (correct), seq 2355697405:2355697565, ack 1986317666, win 486, options [nop,nop,TS val 1884649610 ecr 1731217476], length 160
15:29:06.383264 IP (tos 0x0, ttl 64, id 17423, offset 0, flags [DF], proto TCP (6), length 52)
192.168.1.254.3128 > 192.168.1.211.40994: Flags [.], cksum 0xaba6 (correct), ack 93, win 503, options [nop,nop,TS val 1884649610 ecr 1731217501], length 0
15:29:06.383359 IP (tos 0x0, ttl 64, id 2258, offset 0, flags [DF], proto TCP (6), length 1353)
192.168.1.211.40994 > 192.168.1.254.3128: Flags [P.], cksum 0x8a5d (incorrect -> 0x8fe0), seq 93:1394, ack 1, win 237, options [nop,nop,TS val 1731217505 ecr 1884649610], length 1301
15:29:06.384198 IP (tos 0x0, ttl 64, id 9911, offset 0, flags [DF], proto TCP (6), length 268)
Wednesday, April 11, 2018
How can I setup a Linux NAT Router in Ubuntu?
Steps:
1. Enable packet forwarding for IPv4 between NICs:
Done~
1. Enable packet forwarding for IPv4 between NICs:
- Open and edit /etc/sysctl.conf
- Ucomment net.ipv4.ip_forward=1
- To execute command sysctl -p
- iptables -t nat -A POSTROUTING -o enp0s8 -s 192.168.1.0/24 -j MASQUERADE
- Where enp0s8 is WAN and 192.168.1.0/24 is LAN, please modify those parameters depend on your environment.
- Save rules: iptables-save > /etc/iptables.save
- Restore rules:
- Open and edit /etc/network/interfaces to add pre-up.....
# interfaces(5) file used by ifup(8) and ifdown(8)
auto lo
iface lo inet loopback
auto enp0s3
iface enp0s3 inet static
address 192.168.1.254
netmask 255.255.255.0
pre-up iptables-restore < /etc/iptables.save
Done~
Tuesday, February 27, 2018
如何在Ubuntu 16.04 desktop 透過PXE安裝Ubuntu?
在開始之前,請先準備與安裝相關的service在Ubuntu desktop 16.04 LTS:
準備:
1. Download Ubuntu desktop ISO
2. Download PXE bootloader
安裝:
1. DHCP Server
1. DHCP Server:
* 補充: 針對18.04要修改一下設定檔如下:
APPEND initrd=./u18/initrd_ubuntu18.04.lz root=/dev/nfs boot=casper netboot=nfs nfsroot=192.168.1.254:/var/nfs/ubuntu18.04 splash toram --
4. NFS file Server:
Boot from Network boot:

Done!
準備:
1. Download Ubuntu desktop ISO
2. Download PXE bootloader
安裝:
1. DHCP Server
$ sudo apt-get install isc-dhcp-server2. TFTP Server
$ sudo apt-get install tftpd-hpa inetutils-inetd3. NFS Server
$ sudo apt-get install nfs-kernel-server配置:
1. DHCP Server:
$ sudo vi /etc/dhcp/dhcpd.conf
subnet 192.168.1.0 netmask 255.255.255.0 {
range 192.168.1.200 192.168.1.253;
option domain-name-servers 8.8.8.8;
option routers 192.168.1.1;
option broadcast-address 192.168.1.255;
default-lease-time 600;
max-lease-time 7200;
next-server 192.168.1.254;
filename "pxelinux.0";
}
$ sudo systemctl restart isc-dhcp-server2. TFTP Server:
$ sudo vi /etc/default/tftpd-hpa
TFTP_USERNAME="tftp"
TFTP_DIRECTORY="/var/lib/tftpboot"TFTP_ADDRESS=":69"
TFTP_OPTIONS="--secure"
RUN_DAEMON="yes"
OPTIONS="-l -s /var/lib/tftpboot"
$ sudo vi /etc/xinetd.conf
tftp dgram udp wait root /usr/sbin/in.tftpd /usr/sbin/in.tftpd -s /var/lib/tftpboot
$ sudo systemctl restart tftpd-hpa3. PXE bootloader:
$ tar -xJf syslinux-6.03.tar.xz
$ cd syslinux-6.03
$ sudo cp bios/core/pxelinux.0 /var/lib/tftpboot
$ sudo cp bios/com32/lib/libcom32.c32 /var/lib/tftpboot
$ sudo cp bios/com32/libutil/libutil.c32 /var/lib/tftpboot
$ sudo cp bios/com32/elflink/ldlinux/ldlinux.c32 /var/lib/tftpboot
$ sudo cp bios/com32/menu/vesamenu.c32 /var/lib/tftpboot
$ mkdir /var/lib/tftpboot/pxelinux.cfg
$ sudo vi /var/lib/tftpboot/
pxelinux.cfg/default
DEFAULT vesamenu.c32* Remember to copy vmlinuz.efi and initrd.lz to the folder /var/lib/tftpboot from Ubuntu ISO.
MENU TITLE Network boot
LABEL ubuntu-mate-16.04.2-desktop-amd64
MENU LABEL ubuntu-mate-16.04.2-desktop-amd64
KERNEL vmlinuz.efi
APPEND initrd=initrd.lz root=/dev/nfs boot=casper netboot=nfs nfsroot=192.168.1.254:/var/nfs/ubuntu_desktop splash --
* 補充: 針對18.04要修改一下設定檔如下:
APPEND initrd=./u18/initrd_ubuntu18.04.lz root=/dev/nfs boot=casper netboot=nfs nfsroot=192.168.1.254:/var/nfs/ubuntu18.04 splash toram --
4. NFS file Server:
$ sudo mount -o loop ubuntu-16.04.3-desktop-amd64.iso /mnt/
$ sudo mkdir -p /var/nfs/ubuntu_desktop
$ sudo cp -rf /mnt/* /var/nfs/ubuntu_desktop/
$ sudo vi /etc/exports
/var/nfs/ubuntu_desktop *(ro,sync)
$ sudo systemctl restart nfs-kernel-server
$ showmount -e localhost
Export list for localhost:
/var/nfs/ubuntu_desktop *
Boot from Network boot:

Done!
Tuesday, February 13, 2018
How can I move Launcher from left to the buttom on Ubuntu 16.04?
It's very simple, and it works for me even if I reboot or re-login the system b/c Ubuntu will remember it.
Steps:
1. Open a terminal
2. To execute "gsettings set com.canonical.Unity.Launcher launcher-position Bottom"
Done~
Steps:
1. Open a terminal
2. To execute "gsettings set com.canonical.Unity.Launcher launcher-position Bottom"
Done~
Sunday, February 04, 2018
How can I get detail information of USB device?
The command lsusb, which able to list all USB devices of machine below:
However, I would like to know more informations. For example, speed, vendor, manufacturer......, etc. And there is a command usb-devices, which can help me.
Above you can see the Spd=480/USB 2.0, and Spd=5000/USB 3.0.
lawrence@Lawrence-ThinkPad-X200:~$ lsusb
Bus 002 Device 004: ID 7392:7711 Edimax Technology Co., Ltd EW-7711UTn nLite Wireless Adapter [Ralink RT2870]
Bus 002 Device 001: ID 1d6b:0002 Linux Foundation 2.0 root hub
Bus 008 Device 001: ID 1d6b:0001 Linux Foundation 1.1 root hub
Bus 007 Device 001: ID 1d6b:0001 Linux Foundation 1.1 root hub
Bus 006 Device 001: ID 1d6b:0001 Linux Foundation 1.1 root hub
Bus 001 Device 003: ID 17ef:480c Lenovo Integrated Webcam
Bus 001 Device 001: ID 1d6b:0002 Linux Foundation 2.0 root hub
Bus 005 Device 001: ID 1d6b:0001 Linux Foundation 1.1 root hub
Bus 004 Device 002: ID 08ff:2810 AuthenTec, Inc. AES2810
Bus 004 Device 001: ID 1d6b:0001 Linux Foundation 1.1 root hub
Bus 003 Device 001: ID 1d6b:0001 Linux Foundation 1.1 root hub
lawrence@Lawrence-ThinkPad-X200:~$ usb-devices
T: Bus=02 Lev=01 Prnt=01 Port=00 Cnt=01 Dev#= 4 Spd=480 MxCh= 0
D: Ver= 2.00 Cls=00(>ifc ) Sub=00 Prot=00 MxPS=64 #Cfgs= 1
P: Vendor=7392 ProdID=7711 Rev=01.01
S: Manufacturer=RalinkS: Product=802.11 n WLAN
S: SerialNumber=1.0
C: #Ifs= 1 Cfg#= 1 Atr=80 MxPwr=450mA
I: If#= 0 Alt= 0 #EPs= 7 Cls=ff(vend.) Sub=ff Prot=ff Driver=rt2800usb
T: Bus=04 Lev=00 Prnt=00 Port=00 Cnt=00 Dev#= 1 Spd=5000 MxCh= 2
D: Ver= 3.00 Cls=09(hub ) Sub=00 Prot=03 MxPS= 9 #Cfgs= 1
P: Vendor=1d6b ProdID=0003 Rev=04.13
S: Manufacturer=Linux 4.13.0-32-generic xhci-hcd
S: Product=xHCI Host Controller
S: SerialNumber=0000:0d:00.0
C: #Ifs= 1 Cfg#= 1 Atr=e0 MxPwr=0mA
I: If#= 0 Alt= 0 #EPs= 1 Cls=09(hub ) Sub=00 Prot=00 Driver=hub
Above you can see the Spd=480/USB 2.0, and Spd=5000/USB 3.0.
Sunday, January 28, 2018
[Shell script] Find user in system
#!/bin/bash
if [ $# -eq 0 ]
then
echo "Usage: $0 lawrence"
else
grep "\<$1\>" /etc/passwd > /dev/null
RETVAL=$?
if [ $RETVAL -eq 0 ]
then
echo "Username $1 was found in the system"
else
echo "Cannot find username $1"
fi
fi
The second way:
[ $# -eq 0 ] && { echo "Usage: $0 lawrence" ; exit 1; }
grep "\<$1\>" /etc/passwd > /dev/null
RETVAL=$?
[ $RETVAL -eq 0 ] && echo "Username $1 was found in the system" || echo "Cannot find username $1"
Thursday, January 04, 2018
How can I add EPEL reop on CentOS 7.x?
It's quite simple, just two commands below:
# yum install epel-release
# yum repolist
Sample output:

# yum install epel-release
# yum repolist
Sample output:

Friday, September 29, 2017
How can I disable dnsmasq listen port 53 on the Ubuntu 16.04 LTS?
By default the DNS Server of Ubuntu 16.04 LTS will be 127.0.0.1:53, i.e., localhost.
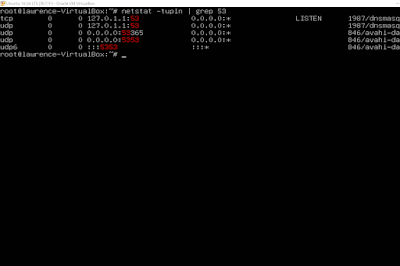
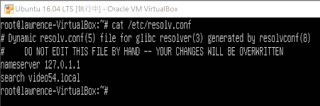
Therefore, system will forward DNS query to the localhost first, and forward to the DNS server which obtained from the DHCP server afterward.
Actually, I didn't prefer this method, so that I would like to turn off this mechanism via steps were listed below:
Steps:
1. Open /etc/NetworkManager/NetworkManager.conf
2. To disable dnsmasq
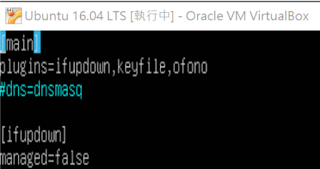
3. Restart NetworkManager
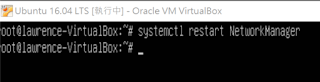
4. Examine /etc/resolv.conf
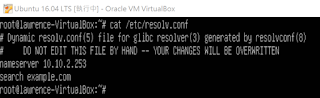
Done.


Therefore, system will forward DNS query to the localhost first, and forward to the DNS server which obtained from the DHCP server afterward.
Actually, I didn't prefer this method, so that I would like to turn off this mechanism via steps were listed below:
Steps:
1. Open /etc/NetworkManager/NetworkManager.conf
2. To disable dnsmasq

3. Restart NetworkManager

4. Examine /etc/resolv.conf

Done.
Friday, September 22, 2017
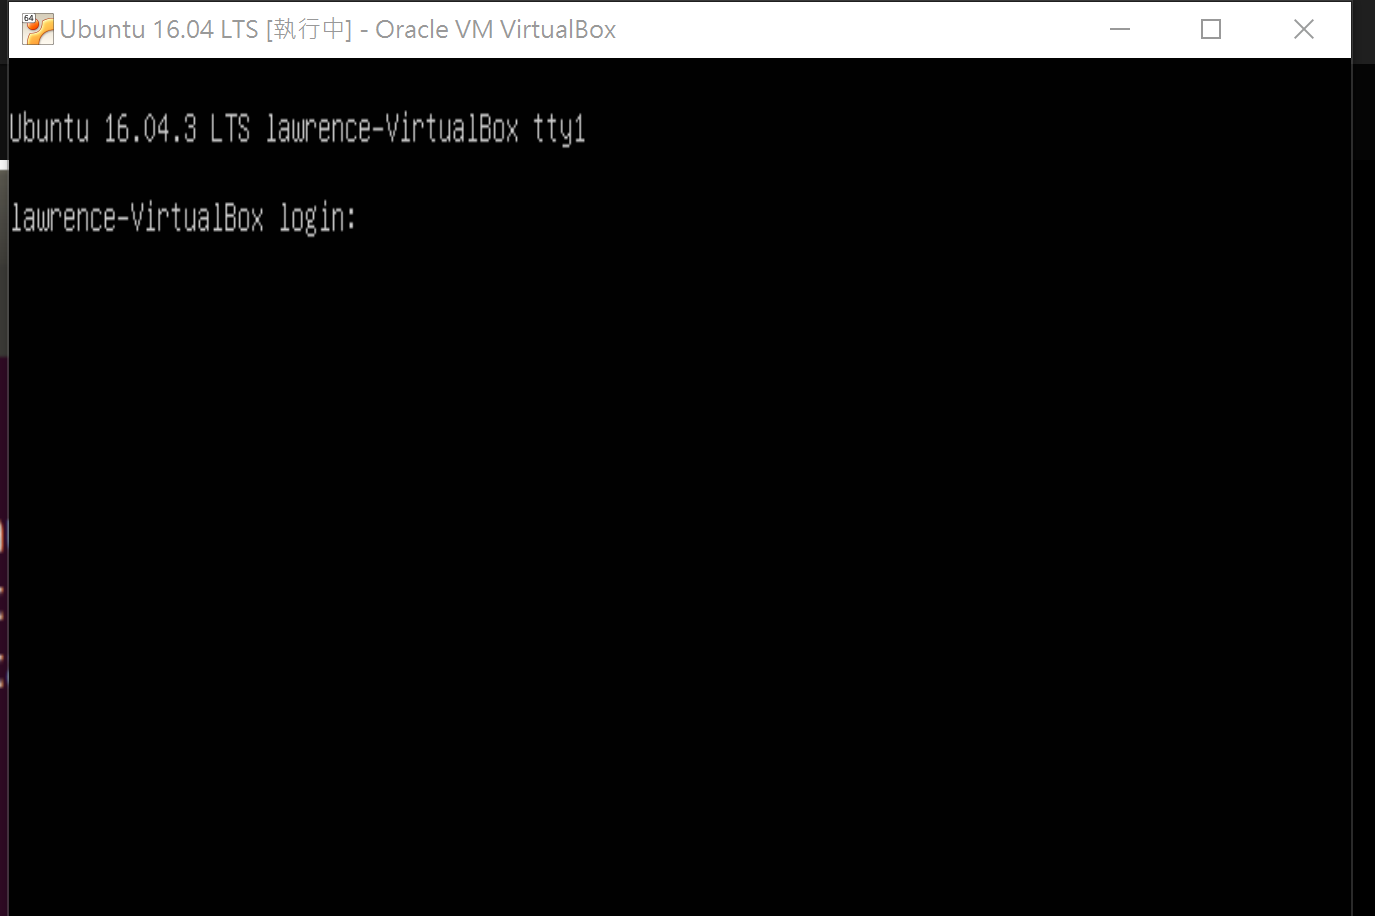
How can I switch multi-user or graphical mode via one command? (Systemd)
To switch multi-user to graphical mode (runlevel 3 to runlevel 5)
# systemctl set-default graphical && reboot


To switch graphical to multi-user mode (runlevel 5 to runlevel 3)
# systemctl set-default multi-user && reboot


# systemctl set-default graphical && reboot


To switch graphical to multi-user mode (runlevel 5 to runlevel 3)
# systemctl set-default multi-user && reboot

Monday, September 18, 2017
How to know the system and service manage daemon of your Linux? (SysVinit or Systemd)
It's simple, just check your pid 1. (ps --pid 1)
SysVinit:

Systemd:

SysVinit:

Systemd:

Thursday, September 14, 2017
How can I backup and restore MBR via dd command?
Check device name of HD:
# lsblk

Backup MBR:
# dd if=/dev/sda of=file bs=1 count=512

Note:
1. The size of MBR is 512 bytes and located in the first sector.
2. Of cause you need to save MBR backup file somewhere else.
Restore MBR:
# dd if=file of=/dev/sda bs=1 count=512

# lsblk

Backup MBR:
# dd if=/dev/sda of=file bs=1 count=512

Note:
1. The size of MBR is 512 bytes and located in the first sector.
2. Of cause you need to save MBR backup file somewhere else.
Restore MBR:
# dd if=file of=/dev/sda bs=1 count=512

Monday, September 11, 2017
Snap commands
Here I want to list some of snap commands that I often use.
Also here is a website to understand all of snap commands:
https://snapcraft.io/docs/reference/snap-command
Log on to a snap store:
Log out snap store:
lawchiu@localhost:~$ snap list
Name Version Rev Developer Notes
checkbox-snappy 2.2 859 ce-certification-qa devmode
core 16-2.27.5 2774 canonical core
hello 2.10 20 canonical -
pc 16.04-0.8 9 canonical gadget
pc-kernel 4.4.0-83.106 68 canonical kernel
lawchiu@localhost:~$
Remove snap:
lawchiu@localhost:~$ snap remove hello
hello removed
Find packages:
lawchiu@localhost:~$ snap find
Also here is a website to understand all of snap commands:
https://snapcraft.io/docs/reference/snap-command
Log on to a snap store:
lawchiu@localhost:~$ sudo snap login xxx.xxx@gmail.comPassword of "xxx.xxx@gmail.com":
Login successful
Log out snap store:
lawchiu@localhost:~$ snap logout
Update snap:
lawchiu@localhost:~$ snap refreshList installed snap:
All snaps up to date
lawchiu@localhost:~$ snap list
Name Version Rev Developer Notes
checkbox-snappy 2.2 859 ce-certification-qa devmode
core 16-2.27.5 2774 canonical core
hello 2.10 20 canonical -
pc 16.04-0.8 9 canonical gadget
pc-kernel 4.4.0-83.106 68 canonical kernel
lawchiu@localhost:~$
Remove snap:
lawchiu@localhost:~$ snap remove hello
hello removed
Find packages:
lawchiu@localhost:~$ snap find
Thursday, September 07, 2017
Install and use glances on Ubuntu
Glances is a great tools which able to monitor CPU, Memory, Disk, Network statistics... etc.
Please refer to glances website for details.
Steps:
1. Install glances via apt:
lawrencechiu@lawrencechiu-HP-Compaq-6005-Pro-SFF-PC:~$ sudo apt-get install glances
2. Executed glances:
lawrencechiu@lawrencechiu-HP-Compaq-6005-Pro-SFF-PC:~$ sudo glances
3. Then you can see CPU usage, Memory status, SWAP, Network statistics, Disk IO, Disk usage, and PID info in one screen below:

Green means OK
Blue means CAREFUL
Purple means WARNING
Red means: CRITICAL
Hotkey:
Please refer to glances website for details.
Steps:
1. Install glances via apt:
lawrencechiu@lawrencechiu-HP-Compaq-6005-Pro-SFF-PC:~$ sudo apt-get install glances
2. Executed glances:
lawrencechiu@lawrencechiu-HP-Compaq-6005-Pro-SFF-PC:~$ sudo glances
3. Then you can see CPU usage, Memory status, SWAP, Network statistics, Disk IO, Disk usage, and PID info in one screen below:

Green means OK
Blue means CAREFUL
Purple means WARNING
Red means: CRITICAL
Hotkey:
a Sort processes automatically b Bytes or bits for network I/O
c Sort processes by CPU% l Show/hide alert logs
m Sort processes by MEM% w Delete warning alerts
p Sort processes by name x Delete warning and critical alerts
i Sort processes by I/O rate 1 Global CPU or per-CPU stats
t Sort processes by CPU times h Show/hide this help screen
d Show/hide disk I/O stats T View network I/O as combination
f Show/hide filesystem stats u View cumulative network I/O
n Show/hide network stats F Show filesystem free space
s Show/hide sensors stats g Generate graphs for current history
2 Show/hide left sidebar r Reset history
z Enable/disable processes stats q Quit (Esc and Ctrl-C also work)
e Enable/disable top extended stats
/ Enable/disable short processes name
D Enable/disable Docker stats
Enjoy~
Thursday, August 31, 2017
How can I remote ssh login to the Ubuntu 16.04 LTS via root?
By default you are unable to ssh login to the Ubuntu 16.04 LTS via root, but you can enable it step by step as following:
1. Login to the system via regular user account.
2. Set password to root account (Due to root password is empty by default)
Done.
1. Login to the system via regular user account.
2. Set password to root account (Due to root password is empty by default)
sudo passwd root3. To modify the configuration file of sshd_config (Marked PermitRootLogin prohibit-password, and added PermitRootLogin yes )
sudo vi /etc/ssh/sshd_config
# Authentication:
LoginGraceTime 120
#PermitRootLogin prohibit-password
PermitRootLogin yes
StrictModes yes
4. Restart sshd
sudo systemctl restart ssh
Done.
Tuesday, August 29, 2017
Unable to logon to the Ubuntu Core with 2nd SSH public key?
After I added a new SSH public key into my Ubuntu One. However, I am unable to logon to the Ubuntu Core system with this new key, therefore I logon to the Ubuntu Core by original public key.
Afterward, I noticed that my system didn't sync up a new public key from Ubuntu One automatically.
Until now I have no idea if this is a defect or limitation, please advice, if any.
Workaround:
Afterward, I noticed that my system didn't sync up a new public key from Ubuntu One automatically.
Until now I have no idea if this is a defect or limitation, please advice, if any.
Workaround:
Added 2nd public key via manually into the ~/.ssh/authorized_keys
Wednesday, August 16, 2017
How to deploy Ubuntu Core from KVM to VirtualBox?
Steps:
1. Download Ubuntu Core of KVM image from URL below:
https://developer.ubuntu.com/core/get-started/kvm
2. To decompress xz.
3. To convert the format of img to the vdi via VBoxManage command below:
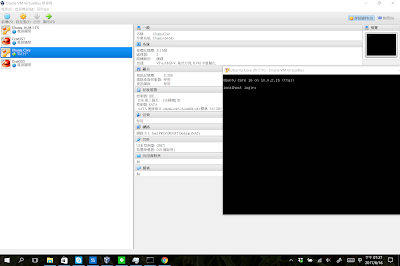
1. Download Ubuntu Core of KVM image from URL below:
https://developer.ubuntu.com/core/get-started/kvm
2. To decompress xz.
3. To convert the format of img to the vdi via VBoxManage command below:
VBoxManage.exe convertdd ubuntu-core-16-amd64.img ubuntu-core-16-amd64.vdi4. Import vdi file above to the VirtualBox without issue.

Subscribe to:
Posts (Atom)