Thursday, March 07, 2019

如何解決Lenovo X1 Carbon 6th 在Linux下無法休眠(S3)的問題?

是的這個問題困擾了我一陣子,今天上網搜尋了一下總算是找到了解決的方法。

首先確定把BIOS升級到1.30以上。(可以透過dmidecode查看)


接下來,將系統重新開機後進入BIOS去選擇: (Default設定是Win10)
Config -> Power -> Sleep State -> Set to Linux

到這邊已經完成了,系統測試一切正常!
Operating System: Ubuntu 18.04.2 LTS
Kernel: Linux 4.15.0-46-generic
Architecture: x86-64

Ubuntu 16.04.6 LTS 釋出囉!

Canonical最近釋出了Ubuntu 16.04.6 LTS更新版本,這一次的更新主要是針對修正APT相關的安全性問題(CVE-2019-3462)。

ISO檔案可以透過以下連結來下載:
http://releases.ubuntu.com/xenial/

另外APT的漏洞在14.04, 18.04, 18.10也都存在相同的問題,不過不用太擔心!只要透過一般的軟體更新機制就可以修正APT安全性的問題。


Friday, February 22, 2019

如何在Ubuntu 18.04.2建立一個anonymous FTP server?

FTP算是一個非常古老的檔案傳輸通訊協定,雖然現今已經不像以前那樣舉足輕重了,但是偶爾拿來使用一下還是挺方便的。

稍微紀錄一下如何在Ubuntu 18.04.2 Desktop建立一台anonymous FTP server。

安裝:
$ sudo apt update && apt install vsftpd

Ubuntu現在很好玩,當你安裝好任何一個service的時候,systemd就會自動把它enable與active,你可以透過以下的命令快速驗證一下:
$ systemctl status vsftpd
$ netstat -tupln | grep ftp


修改vsftpd.conf:
預設vsftpd並不允許anonymous去做檔案的上傳或下載,所以我們需要改變幾個參數讓它支援。
$ sudo vi /etc/vsftpd.conf
# Allow anonymous FTP? (Disabled by default).
anonymous_enable=YES

# Uncomment this to enable any form of FTP write command.
write_enable=YES

# Uncomment this to allow the anonymous FTP user to upload files. This only
# has an effect if the above global write enable is activated. Also, you will
# obviously need to create a directory writable by the FTP user.
anon_upload_enable=YES

改完之後記得重啟
$ sudo systemctl restart vsftpd

建立anonymous FTP folder:
Ubuntu預設的FTP server folder是在/srv/ftp,所以欲分享的檔案可以放在這邊。下圖你可以看到我share的檔案(左)可以被遠端的FTP client抓取(右)。


接下來建立一個folder pub under /srv/ftp來讓遠端user可以透過FTP上傳檔案。
$ cd /srv/ftp
$ sudo mkdir pub
$ sudo chmod 777 pub
$ sudo chown ftp.ftp pub


以上一個anonymous FTP server已經可以開始對外提供服務了,當然之後可以更進一步地研究如何架設一個regular user從自己的家目錄上傳或下載檔案。

補充:
如果你有開ufw(UncomplicatedFirewall)而且預設針對incoming traffic都是deny的話,記得加一下允許FTP連線的rule,例如:
$ sudo ufw allow from any to any port 20,21 proto tcp
(這邊暫時不考慮FTP PASV mode, 所以只需要開放TCP port 20,21) 

如何在Ubuntu 18.04 LTS開啟HWE(Hardware Enablement Stack)

簡單的說明一下我個人覺得HWE的主要用途:


透過HWE為現有的Ubuntu LTS版本(Desktop, Server, Cloud)提供了更新的Kernel和X來進一步支援新的硬體。比方說預設18.04 LTS是採用Kernel 4.15,然而透過HWE的機制,使用者可以在18.04 LTS跑Kernel 4.18(18.10預設內核)。

以下透過Ubuntu Server來實做一下:

1. 檢查系統是否有支援HWE:
root@server1 ~# hwe-support-status --verbose


2. 開啟HWE:
root@server1 ~# sudo apt install --install-recommends linux-generic-hwe-18.04


3. 確定Kernel可以透過HWE更新到4.18:


是不是很簡單呢? :)

後記補充:
18.04.2 預設是安裝Kernel 4.18(Fresh install),但如果想從既有的18.04升級到18.04.2,看起來Kernel還是會停留在4.15,所以如果需要新的Kernel或是新的drivers,可以考慮透過HWE來升級這些部份。

Monday, February 11, 2019

Ubuntu 14.04 LTS即將步入End of Life

還在使用Ubuntu 14.04 LTS的發行版本嗎? 但是14.04即將在2019/4/30步入End of Life囉~ 所以到時候就沒有辦法繼續讓14.04 LTS的機器可以享有最新版本的Linux Kernel或是應用軟體安全性相關的升級.

不過其實也不用太擔心啦! 一般用戶的話, 建議可以把14.04考慮升級成16.04或是18.04 LTS, 但如果是企業用戶還想停留在14.04操作環境的話其實可以考慮Canonical Ubuntu Advantage讓運行在企業裡面的Ubuntu 14.04 LTS將來持續有安全性更新.

至於如何將14.04升級到16.04或是18.04呢? 其實步驟很簡單, 可以參考以下的連結透過全圖形化介面就可以輕鬆升級:
https://tutorials.ubuntu.com/tutorial/tutorial-upgrading-ubuntu-desktop#0

順帶一提2019/3/6有個線上的session可以參考囉~
How to ensure the ongoing security compliance of Ubuntu 14.04 LTS ‘Trusty Tahr’

Saturday, February 02, 2019

ThinkPad X1 Carbon 6th + Ubuntu 18.04 + LVFS

前言:

以往Linux的使用者如果要做BIOS或韌體升級的話,通常實作的方法有兩種:

1. 切換到Windows去執行廠商所提供的工具來升級。
2. 手動抓取相關的firmware然後自行製作開機disk來升級。
換句話說,其實對Linux使用者是挺不方便的,所以有人提出了LVFS project這個好主意。

LVFS(Linux Vendor Firmware Service)? 其實白話來說就是提供一個public pool然後邀請各家OEM/ODM廠商把自家最新的硬體firmware放上去,之後Linux系統便可以會透過fwupd這隻daemon去下載並且更新最新的firmware。

更多詳細的資訊可以參考LVFS的網站:
https://fwupd.org/users

以下是我擷取Ubunut 18.04在GNOME的畫面,可以看到我的X1有相關新firmware或是BIOS可以更新了。


所以如果Linux系統提醒你/妳可以升級BIOS的時候,也不用太訝異囉~ :D

Tuesday, January 08, 2019

Canonical Livepatch service

其實我沒接觸過Canonical Livepatch service,直到公司內部有同事在internal meeting裡面介紹後,我才發現到這個功能對於廣大的IT人員將會是一個非常好用的功能,而且某些程度上還可以減少些出錯的機會。

關於Canonical Livepatch service,我個人覺得它最主要的目的就是可以讓Linux kernel安裝上一些fixes但是系統不需要重新開機!而且kernel也不需要整個升級,相信對於一些系統必需保持在某個版本的kernel,或是不允許重新開機跟system downtime很要求的環境,這個功能確實是非常實用!

Canonical livepatch service其實在Ubuntu 14.04就開始支援了,但當時只支援CLI去配置Canonical livepatch service,不過從18.04之後,在GUI就可以很簡單的開啟以及使用它。

關於CLI如何使用,可以參考以下的連結:
https://blog.ubuntu.com/2017/06/06/canonical-kernel-livepatch-service-now-available-for-ubuntu-14-04-lts
https://www.ubuntu.com/livepatch 

GUI的話可以參考下面幾個步驟:
1. Software & Updates -> Updates.


2. 點選Sign in button.


3. 輸入你的Ubuntu SSO帳號(Ubuntu One account)。


4. 接著輸入Ubuntu 2 factor authentication。


如果順利的話,你可以看到Sing in button變成Sing Out,順便用CLI檢查一下。


所以當Sing in成功後,系統會從snap store自動安裝canonical-livepatch,相關的token也會自動抓取下來,比起14.04 or 16.04來說真的方便許多!

最後這邊要注意一下,Canonical livepatch service預設一組Ubuntu One帳號只允許3台機器使用,如果你是企業用戶的話,那可以考慮Ubuntu advantage來支援更多的機器。

Thursday, January 03, 2019

在Ubuntu 18.04 架設VNC Server

很久前有筆記過如何在CentOS7上架設VNC Server,這幾天實做了一下VNC Server在Ubuntu 18.04上。

以下就簡單紀錄一下步驟。

Steps:
1. Install VNC Server (遠端桌面環境將採用xfce):
$ sudo apt-get install vnc4server xfce4 xfce4-goodies
2. 建立VNC server的配置檔與user密碼:
$ vncpasswd
$ vim.tiny ~/.vnc/xstartup
#!/bin/sh
unset SESSION_MANAGER
unset DBUS_SESSION_BUS_ADDRESS
exec startxfce4 
$ chmod 755 ~/.vnc/xstartup
3. 手動啟動VNC Server:
這個時候我們先測試看看VNC Server可不可以正常工作。


如果有看到以上類似的畫面,那說明VNC Server已經啟動並且listen在TCP port 5901。但是請注意,預設它會只listen在localhost,這個等一下在建立systemd startup script的時候,我們可以修改它。
4. 建立systemd startup script: 
 做這個設定的最大好處是將來系統重開機後,我就不需要每次都要手動啟動VNC Server了。
4.1 建立VNC Server script file:
 $ sudo vim.tiny /etc/systemd/system/vncserver@.service
[Unit]
Description=Remote desktop service (VNC)
After=syslog.target network.target

[Service]
Type=simple
User=u
PAMName=login
PIDFile=/home/%u/.vnc/%H%i.pid
ExecStartPre=/bin/sh -c '/usr/bin/vncserver -localhost no -kill :%i > /dev/null 2>&1 || :'
ExecStart=/usr/bin/vncserver :%i -localhost no -geometry 1440x900 -alwaysshared -fg
ExecStop=/usr/bin/vncserver -kill :%i

[Install]
WantedBy=multi-user.target
剛剛有提到預設VNC Server只會listen在localhost:5901,但透過參數-localhost no可以讓它listen在0.0.0.0也就是all net的概念。 
4.2 手動reload systemd: (每次有新增或修改systemd的startup script file後,記得此步驟)
$ sudo systemctl daemon-reload
4.3 透過systemd啟動VNC Server:
$ sudo systemctl start vncserver@1.service
4.4 在系統開機時,自動啟動VNC Server:
$ sudo systemctl enable vncserver@1.service
假設一切順利的話,輸入相關的命令後,應該可以看到類似的畫面。


 5. 遠端測試: (採用Ubuntu內建的Remmina remote desktop client)

Friday, December 28, 2018

2018 Top 10的Snap 套件

即將邁入2019,回顧一下2018 前10名最受喜愛的snap套件是哪些呢?

剛看了一下敝公司的官方網頁,以下有Top10的排行榜唷~ :D
https://blog.ubuntu.com/2018/12/27/top-snaps-in-2018

不過說真的,我個人蠻常用的Skype, mailspring, simplenote現在都用snap來安裝,並且會自動定時更新,超方便的呀~

不知道何時會有line for snap?

Wednesday, September 19, 2018

How can I setup an IPv6 router via radvd on Ubuntu 18.04 LTS?

What's radvd?
Router advertisement daemon.

Reference:
https://zh.wikipedia.org/wiki/Radvd
http://www.litech.org/radvd/

一般來說 IPv6 Client決定Global IPv6的方式有兩種,分別是Stateless與Stateful,預設radvd是採用stateless IPv6,不過透過更改某個參數(M flag),就可以轉換成stateful,但是此時網路上必須有對應的DHCPv6 server來負責管理與分配IPv6 address。

網路上可以找到很多先進寫的資料關於Stateless與Stateful的差異,我也就不班門弄斧了,廢話不多說,直接進入主題,如何架設radvd在Canonical/Ubuntu 18.04 LTS

Steps:

Step1. Install radvd package.
$ sudo apt-get install radvd
Step2. Copy example file of radvid.conf from /usr/share/doc/radvd/examples/ to /etc.
$ sudo cp /usr/share/doc/radvd/examples/radvd.conf.example /etc/radvd.conf
Step3. Open/Edit radvd.conf
根據你的需求,去配置相關的參數,最重要的應該是prefix,更多詳細的參數可以參考man page。
https://www.systutorials.com/docs/linux/man/5-radvd.conf/
Step4. Restart radvd
$ sudo systemctl restart radvd; sudo systemctl enable radvd

以上一個簡單的IPv6 stateless的Router已經架設完成,IPv6 client現在自己可以搭配prefix自動產生host ID。


Wednesday, August 15, 2018

How can I configure Ubuntu 16 to start teamviewer automatically?

Steps:

1. Opened /etc/init.d/rc.local

$ sudo vi /etc/init.d/rc.local


2. Added teamviewer's command and parameter below in file rc.local:
teamviewer passwd ubuntu
3. Restart system

4. Examine if teamviewer daemon can work as expected:

$ systemctl status teamviewerd
● teamviewerd.service - TeamViewer remote control daemon
   Loaded: loaded (/etc/systemd/system/teamviewerd.service; enabled; vendor preset: enabled)
   Active: active (running) since 三 2018-08-15 11:00:14 CST; 1min 25s ago
  Process: 1555 ExecStart=/opt/teamviewer/tv_bin/teamviewerd -d (code=exited, status=0/SUCCESS)
 Main PID: 1567 (teamviewerd)
   CGroup: /system.slice/teamviewerd.service
           └─1567 /opt/teamviewer/tv_bin/teamviewerd -d

$ ps aux | grep -i teamviewer
root      1567  0.3  0.3 1181612 12212 ?       Sl   11:00   0:00 /opt/teamviewer/tv_bin/teamviewerd -d
u         1890  0.3  2.2 1990224 88556 ?       Sl   11:00   0:00 /opt/teamviewer/tv_bin/TeamViewer
Afterwards, you can remote control host via Partner ID and password which is ubuntu in this example.


Friday, May 04, 2018

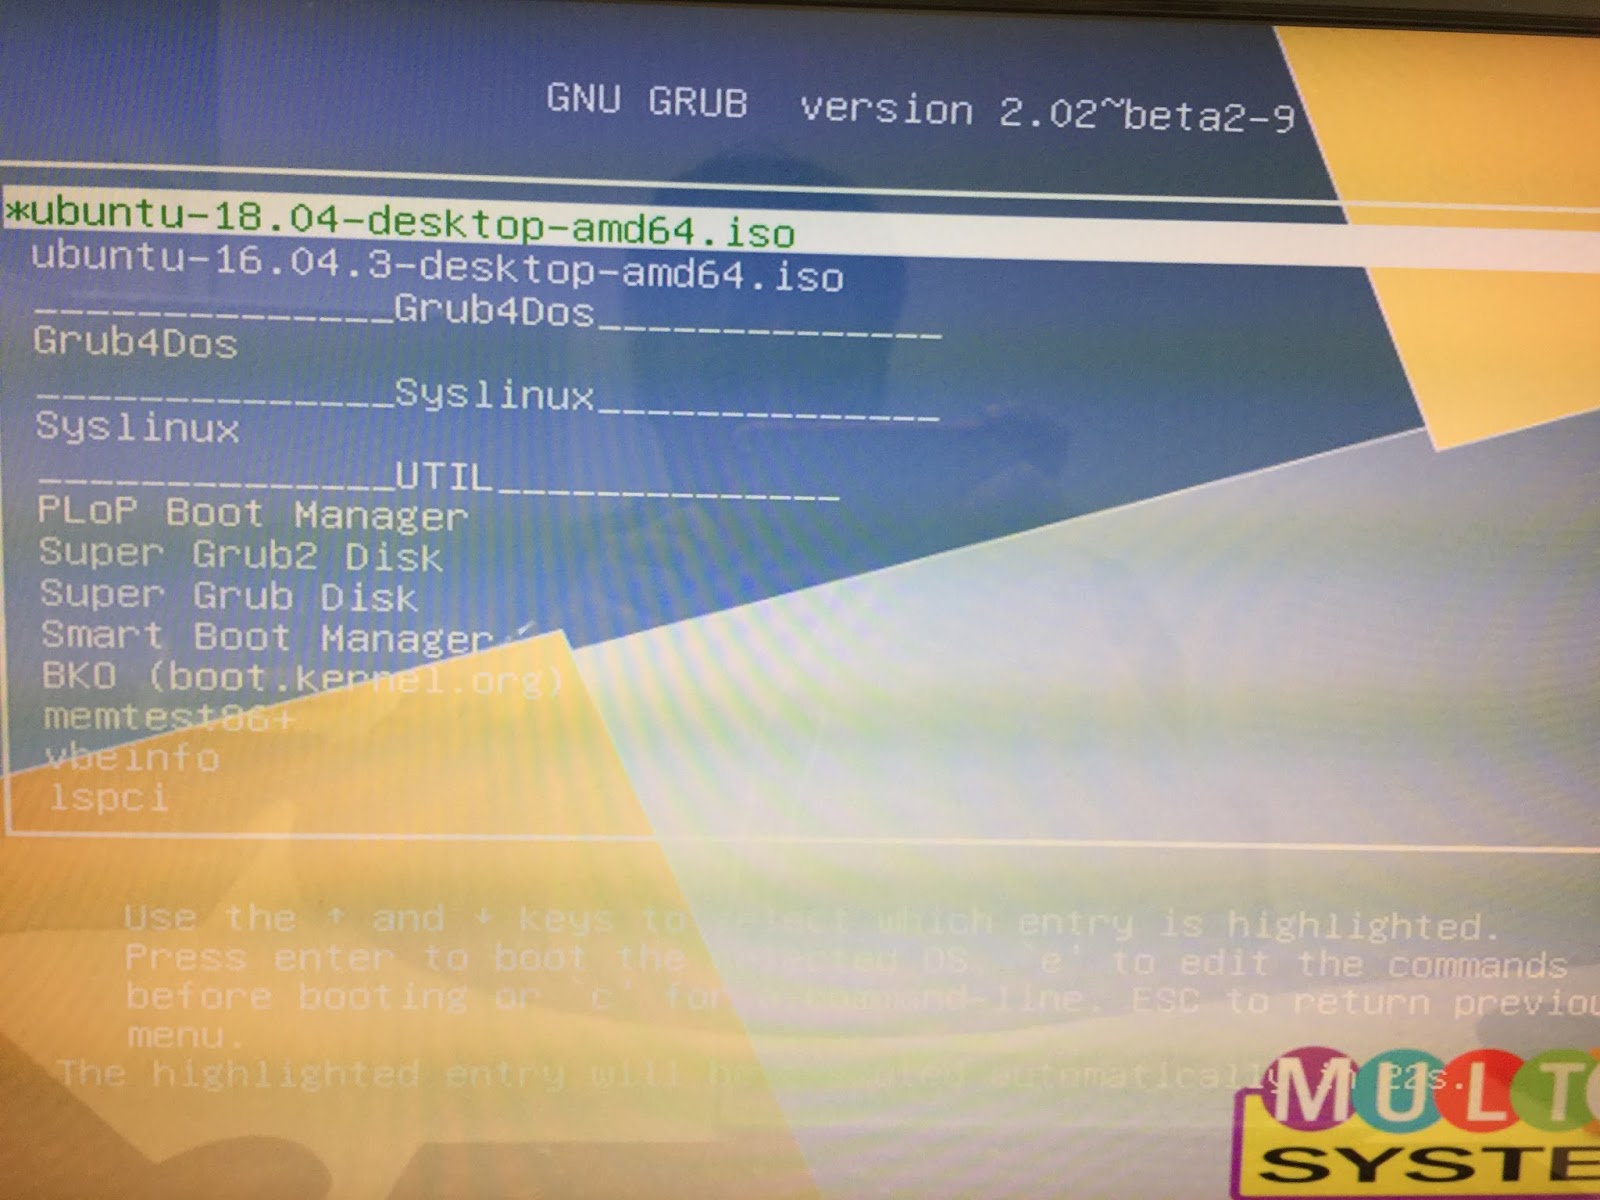
How can I create a multiboot USB stick from Linux?

You can refer to https://www.pendrivelinux.com/multiboot-create-a-multiboot-usb-from-linux/

It works for me!


Above you can see that I am able to boot Ubuntu 16.03 as well as 18.04 with one USB stick w/o problem.

But somehow you've to disable security boot in BIOS.

Enjoy~

How can I setup a proxy server in Ubuntu 16.04?

Step1. Install package squid
# sudo apt-get install -y squid

Step2. To setup common proxy settings:
# sudo vi /etc/squid/squid.conf

To add some lines below:
# line 977
acl lan src 192.168.1.0/24
(where 192.168.1.0 means network you would like to allow client to access your proxy server)

# line 1189
http_access allow lan
(Allow lan here)

# line 1602
http_port 3128
(To modify default proxy port if needed)

Step3. Restart squid
# sudo systemctl restart squid

Step4. Examine squid service
# sudo systemctl status squid
● squid.service - LSB: Squid HTTP Proxy version 3.x
Loaded: loaded (/etc/init.d/squid; bad; vendor preset: enabled)
Active: active (running) since 四 2018-04-26 15:24:04 CST; 1min 56s ago
Docs: man:systemd-sysv-generator(8)
Process: 3088 ExecStop=/etc/init.d/squid stop (code=exited, status=0/SUCCESS)
Process: 3119 ExecStart=/etc/init.d/squid start (code=exited, status=0/SUCCESS)
CGroup: /system.slice/squid.service
├─3159 /usr/sbin/squid -YC -f /etc/squid/squid.conf
├─3161 (squid-1) -YC -f /etc/squid/squid.conf
├─3162 (logfile-daemon) /var/log/squid/access.log
└─3163 (pinger)

四 26 15:24:04 uc16-VirtualBox systemd[1]: Starting LSB: Squid HTTP Proxy version 3.x...
四 26 15:24:04 uc16-VirtualBox squid[3119]: * Starting Squid HTTP Proxy squid
四 26 15:24:04 uc16-VirtualBox squid[3159]: Squid Parent: will start 1 kids
四 26 15:24:04 uc16-VirtualBox squid[3119]: ...done.
四 26 15:24:04 uc16-VirtualBox systemd[1]: Started LSB: Squid HTTP Proxy version 3.x.
四 26 15:24:04 uc16-VirtualBox squid[3159]: Squid Parent: (squid-1) process 3161 started

# netstat -tupln | grep 3128
tcp6 0 0 :::3128 :::* LISTEN 3161/(squid-1)

Done ~

In proxy client side:
You can use tcpdump or wireshark to ensure that http request will go to proxy server after you configured http proxy server within browser.

root@server1:~$ sudo tcpdump -n -v -i any port 3128
tcpdump: listening on any, link-type LINUX_SLL (Linux cooked), capture size 262144 bytes
15:29:06.382845 IP (tos 0x0, ttl 64, id 2257, offset 0, flags [DF], proto TCP (6), length 145)
192.168.1.211.40994 > 192.168.1.254.3128: Flags [P.], cksum 0x85a5 (incorrect -> 0x9ba8), seq 670754847:670754940, ack 314235908, win 237, options [nop,nop,TS val 1731217504 ecr 1884649606], length 93
15:29:06.383195 IP (tos 0x0, ttl 64, id 35299, offset 0, flags [DF], proto TCP (6), length 212)
192.168.1.254.3128 > 192.168.1.211.40998: Flags [P.], cksum 0xbf6c (correct), seq 2355697405:2355697565, ack 1986317666, win 486, options [nop,nop,TS val 1884649610 ecr 1731217476], length 160
15:29:06.383264 IP (tos 0x0, ttl 64, id 17423, offset 0, flags [DF], proto TCP (6), length 52)
192.168.1.254.3128 > 192.168.1.211.40994: Flags [.], cksum 0xaba6 (correct), ack 93, win 503, options [nop,nop,TS val 1884649610 ecr 1731217501], length 0
15:29:06.383359 IP (tos 0x0, ttl 64, id 2258, offset 0, flags [DF], proto TCP (6), length 1353)
192.168.1.211.40994 > 192.168.1.254.3128: Flags [P.], cksum 0x8a5d (incorrect -> 0x8fe0), seq 93:1394, ack 1, win 237, options [nop,nop,TS val 1731217505 ecr 1884649610], length 1301
15:29:06.384198 IP (tos 0x0, ttl 64, id 9911, offset 0, flags [DF], proto TCP (6), length 268)

Wednesday, April 11, 2018

How can I setup a Linux NAT Router in Ubuntu?

Steps:

1. Enable packet forwarding for IPv4 between NICs:

  • Open and edit /etc/sysctl.conf
  • Ucomment net.ipv4.ip_forward=1
  • To execute command sysctl -p
2. Create a postrouting rule within iptables:

  • iptables -t nat -A POSTROUTING -o enp0s8 -s 192.168.1.0/24 -j MASQUERADE
  • Where enp0s8 is WAN and 192.168.1.0/24 is LAN, please modify those parameters depend on your environment.
3. Save and restore iptables rule after reboot:

  • Save rules: iptables-save > /etc/iptables.save
  • Restore rules:
  • Open and edit /etc/network/interfaces to add pre-up.....

# interfaces(5) file used by ifup(8) and ifdown(8)
auto lo
iface lo inet loopback
auto enp0s3
iface enp0s3 inet static
address 192.168.1.254
netmask 255.255.255.0
pre-up iptables-restore < /etc/iptables.save

    Done~

    Tuesday, February 27, 2018

    如何在Ubuntu 16.04 desktop 透過PXE安裝Ubuntu?

    在開始之前,請先準備與安裝相關的service在Ubuntu desktop 16.04 LTS:

    準備:
    1. Download Ubuntu desktop ISO
    2. Download PXE bootloader

    安裝:
    1. DHCP Server
    $ sudo apt-get install isc-dhcp-server
    2. TFTP Server
    $ sudo apt-get install tftpd-hpa inetutils-inetd
    3. NFS Server
    $ sudo apt-get install nfs-kernel-server
    配置:
    1. DHCP Server:
    $ sudo vi /etc/dhcp/dhcpd.conf
     subnet 192.168.1.0 netmask 255.255.255.0 {
     range 192.168.1.200 192.168.1.253;
     option domain-name-servers 8.8.8.8;
     option routers 192.168.1.1;
     option broadcast-address 192.168.1.255;
     default-lease-time 600;
     max-lease-time 7200;
     next-server 192.168.1.254;
     filename "pxelinux.0";

     }
     $ sudo systemctl restart isc-dhcp-server
     2. TFTP Server:
    $ sudo vi /etc/default/tftpd-hpa
    TFTP_USERNAME="tftp"
    TFTP_DIRECTORY="/var/lib/tftpboot"TFTP_ADDRESS=":69"
    TFTP_OPTIONS="--secure"
    RUN_DAEMON="yes"
    OPTIONS="-l -s /var/lib/tftpboot"
    $ sudo vi /etc/xinetd.conf
    tftp    dgram   udp    wait    root    /usr/sbin/in.tftpd /usr/sbin/in.tftpd -s /var/lib/tftpboot
    $ sudo systemctl restart tftpd-hpa 
    3. PXE bootloader:
    $ tar -xJf syslinux-6.03.tar.xz
    $ cd syslinux-6.03
    $ sudo cp bios/core/pxelinux.0 /var/lib/tftpboot
    $ sudo cp bios/com32/lib/libcom32.c32 /var/lib/tftpboot
    $ sudo cp bios/com32/libutil/libutil.c32 /var/lib/tftpboot
    $ sudo cp bios/com32/elflink/ldlinux/ldlinux.c32 /var/lib/tftpboot
    $ sudo cp bios/com32/menu/vesamenu.c32 /var/lib/tftpboot
    $ mkdir /var/lib/tftpboot/pxelinux.cfg
    $ sudo vi /var/lib/tftpboot/

    pxelinux.cfg/default 
    DEFAULT vesamenu.c32
    MENU TITLE Network boot
    LABEL ubuntu-mate-16.04.2-desktop-amd64
      MENU LABEL ubuntu-mate-16.04.2-desktop-amd64
      KERNEL vmlinuz.efi
      APPEND initrd=initrd.lz root=/dev/nfs boot=casper netboot=nfs nfsroot=192.168.1.254:/var/nfs/ubuntu_desktop splash -- 
    * Remember to copy vmlinuz.efi and initrd.lz to the folder /var/lib/tftpboot from Ubuntu ISO.
    * 補充: 針對18.04要修改一下設定檔如下:
      APPEND initrd=./u18/initrd_ubuntu18.04.lz root=/dev/nfs boot=casper netboot=nfs nfsroot=192.168.1.254:/var/nfs/ubuntu18.04 splash toram --


    4. NFS file Server:
    $ sudo mount -o loop ubuntu-16.04.3-desktop-amd64.iso /mnt/
    $ sudo mkdir -p /var/nfs/ubuntu_desktop
    $ sudo cp -rf /mnt/* /var/nfs/ubuntu_desktop/
    $ sudo vi /etc/exports

    /var/nfs/ubuntu_desktop *(ro,sync)
    $ sudo systemctl restart nfs-kernel-server
    $ showmount -e localhost 
    Export list for localhost:
    /var/nfs/ubuntu_desktop *

    Boot from Network boot:


    Done!

    Tuesday, February 13, 2018

    How can I move Launcher from left to the buttom on Ubuntu 16.04?

    It's very simple, and it works for me even if I reboot or re-login the system b/c Ubuntu will remember it.

    Steps:
    1. Open a terminal

    2. To execute "gsettings set com.canonical.Unity.Launcher launcher-position Bottom"

    Done~

    Sunday, February 04, 2018

    How can I get detail information of USB device?

    The command lsusb, which able to list all USB devices of machine below:
    lawrence@Lawrence-ThinkPad-X200:~$ lsusb
    Bus 002 Device 004: ID 7392:7711 Edimax Technology Co., Ltd EW-7711UTn nLite Wireless Adapter [Ralink RT2870]
    Bus 002 Device 001: ID 1d6b:0002 Linux Foundation 2.0 root hub
    Bus 008 Device 001: ID 1d6b:0001 Linux Foundation 1.1 root hub
    Bus 007 Device 001: ID 1d6b:0001 Linux Foundation 1.1 root hub
    Bus 006 Device 001: ID 1d6b:0001 Linux Foundation 1.1 root hub
    Bus 001 Device 003: ID 17ef:480c Lenovo Integrated Webcam
    Bus 001 Device 001: ID 1d6b:0002 Linux Foundation 2.0 root hub
    Bus 005 Device 001: ID 1d6b:0001 Linux Foundation 1.1 root hub
    Bus 004 Device 002: ID 08ff:2810 AuthenTec, Inc. AES2810
    Bus 004 Device 001: ID 1d6b:0001 Linux Foundation 1.1 root hub
    Bus 003 Device 001: ID 1d6b:0001 Linux Foundation 1.1 root hub


    However, I would like to know more informations. For example, speed, vendor, manufacturer......, etc. And there is a command usb-devices, which can help me.


    lawrence@Lawrence-ThinkPad-X200:~$ usb-devices 
    T:  Bus=02 Lev=01 Prnt=01 Port=00 Cnt=01 Dev#=  4 Spd=480 MxCh= 0
    D:  Ver= 2.00 Cls=00(>ifc ) Sub=00 Prot=00 MxPS=64 #Cfgs=  1
    P:  Vendor=7392 ProdID=7711 Rev=01.01
    S:  Manufacturer=RalinkS:  Product=802.11 n WLAN
    S:  SerialNumber=1.0
    C:  #Ifs= 1 Cfg#= 1 Atr=80 MxPwr=450mA
    I:  If#= 0 Alt= 0 #EPs= 7 Cls=ff(vend.) Sub=ff Prot=ff Driver=rt2800usb
    T:  Bus=04 Lev=00 Prnt=00 Port=00 Cnt=00 Dev#=  1 Spd=5000 MxCh= 2
    D:  Ver= 3.00 Cls=09(hub  ) Sub=00 Prot=03 MxPS= 9 #Cfgs=  1
    P:  Vendor=1d6b ProdID=0003 Rev=04.13
    S:  Manufacturer=Linux 4.13.0-32-generic xhci-hcd
    S:  Product=xHCI Host Controller
    S:  SerialNumber=0000:0d:00.0
    C:  #Ifs= 1 Cfg#= 1 Atr=e0 MxPwr=0mA
    I:  If#= 0 Alt= 0 #EPs= 1 Cls=09(hub  ) Sub=00 Prot=00 Driver=hub


    Above you can see the Spd=480/USB 2.0, and Spd=5000/USB 3.0.

    Sunday, January 28, 2018

    [Shell script] Find user in system


    The first way:

    #!/bin/bash

    if [ $# -eq 0 ]
    then
     echo "Usage: $0 lawrence"
    else
      grep "\<$1\>" /etc/passwd > /dev/null
      RETVAL=$?
      if [ $RETVAL -eq 0 ]
      then
       echo "Username $1 was found in the system"
      else
       echo "Cannot find username $1"
     fi
    fi

    The second way:

    [ $# -eq 0 ] &&  { echo "Usage: $0 lawrence" ; exit 1; }

    grep "\<$1\>" /etc/passwd > /dev/null
    RETVAL=$?

    [ $RETVAL -eq 0 ] && echo "Username $1 was found in the system" || echo "Cannot find username $1"

    Thursday, January 04, 2018

    How can I add EPEL reop on CentOS 7.x?

    It's quite simple, just two commands below:

    # yum install epel-release

    # yum repolist

    Sample output:

    Friday, September 29, 2017

    How can I disable dnsmasq listen port 53 on the Ubuntu 16.04 LTS?

    By default the DNS Server of Ubuntu 16.04 LTS will be 127.0.0.1:53, i.e., localhost.


    Therefore, system will forward DNS query to the localhost first, and forward to the DNS server which obtained from the DHCP server afterward.

    Actually, I didn't prefer this method, so that I would like to turn off  this mechanism via steps were listed below:

    Steps:
    1. Open /etc/NetworkManager/NetworkManager.conf

    2. To disable dnsmasq


    3. Restart NetworkManager


    4. Examine /etc/resolv.conf


    Done.