Test Environment:
L2TP Client ---------- L2TP Server
L2TP Client: Windows XP SP2
L2TP Server: CentOS 5.0
IP address of L2TP Client: 10.5.30.200
IP address of L2TP Server: 10.5.30.3
必要套件:
xl2tpd-1.1.09-1.fc5.src.rpm
openswan-2.4.9-31.el5.i386.rpm
ipsec-tools* (預設已安裝)
ppp* (預設已安裝)
Setup Procedure:
1.Install RPM:
# rpm –ivh openswan*
# rpm –ivh xl2tpd* (That’s source rpm you must rebuild it)
2.Configure L2TP Server:
2.1 設定帳號與密碼:
# vi /etc/ppp/chap-secrets
lawrence * “redhat” *
2.2 設定xl2tpd設定檔:
[global]
; listen-addr = 192.168.1.98
;
;requires openswan-3.1
;ipsec saref = yes
;
;debug tunnel = yes
auth file = /etc/ppp/chap-secrets
[lns default]
ip range = 192.168.1.128-192.168.1.254
local ip = 192.168.1.99
require chap = yes
refuse pap = yes
require authentication = yes
name = LinuxVPNserver
ppp debug = yes
pppoptfile = /etc/ppp/options.xl2tpd
length bit = yes
2.3 設定/etc/ppp/options.xl2tpd
ipcp-accept-local
ipcp-accept-remote
ms-dns 192.168.1.1
ms-dns 192.168.1.3
ms-wins 192.168.1.2
ms-wins 192.168.1.4
noccp
auth
crtscts
idle 1800
#mtu 1410
#mru 1410
nodefaultroute
debug
lock
proxyarp
connect-delay 5000
logfile /var/log/xl2tpd.log
2.4 啟動L2TP Server
# service xl2tpd start; chkconfig xl2tpd on
3. 設定IPSec
3.1 PSK setting:
# vi /etc/ipsec.secrets
include /etc/ipsec.d/*.secrets
10.5.30.3 %any : PSK "1234567890"
10.5.30.3 -> Server IP address
%any -> allow all machines
格式要一模一樣,不然會出錯
3.2 設定l2tp-psk.conf
套用範例即可:
# cp /etc/ipsec.d/examples/l2tp-psk.conf /etc/ipsec.d/
# chmod 755 l2tp-psk.conf
3.3 啟動IPSec
# service ipsec start; chkconfig ipsec on
3.4 Check IPSec status
# ipsec verify
Checking your system to see if IPsec got installed and started correctly:
Version check and ipsec on-path [OK]
Linux Openswan Uopenswan-2.4.9-31.el5/K2.6.18-8.1.8.el5 (netkey)
Checking for IPsec support in kernel [OK]
NETKEY detected, testing for disabled ICMP send_redirects [OK]
NETKEY detected, testing for disabled ICMP accept_redirects [OK]
Checking for RSA private key (/etc/ipsec.d/hostkey.secrets) [OK]
Checking that pluto is running [OK]
Two or more interfaces found, checking IP forwarding [OK]
Checking NAT and MASQUERADEing [N/A]
Checking for 'ip' command [OK]
Checking for 'iptables' command [OK]
Opportunistic Encryption Support [DISABLED]
這麼一來L2TP over IPSec就成功架設起來了,如果有問題的話可查看以下的log file
/var/log/message
/var/log/secure
/var/log/xl2tpd.log
4. L2TP Client setting:
4.1新增連線
1. 開始->設定->網路連線->新增連線精靈
2. 選擇連線到公司網路(使用指定撥號或是vpn)
3. 選擇虛擬私人網路連線
4. 輸入名稱(可以隨意選)
5. 輸入VPN server IP (10.5.30.3)
4.2 修改設定
1.在安全性的分頁中->選擇進階->只勾選CHAP->可省加密
2. 點選"ipsec 設定"選項,輸入PSK(pre-shared key)
Thursday, August 30, 2007

Thursday, August 23, 2007
Shell Script: 計算CPU的使用率
Monday, August 20, 2007
Setup a POP3 Server that enables SSL/TLS function
OS: CentOS4.5
POP3 Server: dovecot
Setup procedure:
1. Edit /etc/dovecot.conf
->
protocols = pop3 pop3s
imap_listen = [::]
pop3_listen = [::]
ssl_disable = no
ssl_cert_file = /usr/share/ssl/certs/dovecot.pem
ssl_key_file = /usr/share/ssl/private/dovecot.pem
disable_plaintext_auth = no
login_dir = /var/run/dovecot-login
login = imap
login = pop3
mbox_locks = fcntl
auth = default
auth_mechanisms = plain
auth_userdb = passwd
auth_passdb = pam
auth_user = root
2. Start dovecot
# service dovecot start; chkconfig dovecot on
POP3 Server: dovecot
Setup procedure:
1. Edit /etc/dovecot.conf
->
protocols = pop3 pop3s
imap_listen = [::]
pop3_listen = [::]
ssl_disable = no
ssl_cert_file = /usr/share/ssl/certs/dovecot.pem
ssl_key_file = /usr/share/ssl/private/dovecot.pem
disable_plaintext_auth = no
login_dir = /var/run/dovecot-login
login = imap
login = pop3
mbox_locks = fcntl
auth = default
auth_mechanisms = plain
auth_userdb = passwd
auth_passdb = pam
auth_user = root
2. Start dovecot
# service dovecot start; chkconfig dovecot on
Friday, August 17, 2007
讓Linux可以讀寫NTFS磁區
帽客家裡的大黑(IBM桌機)有兩顆HDD,一顆是安裝CentOS5另一顆是Windows XP PRO SP2,所以有時開到CentOS的工作環境而想讀寫NTFS磁區時,我記得我之前只解決了讀的問題,昨天上Google發現到現在連寫的問題也解決了,我真是後知後覺呀!
只要安裝好ntfs-3g與fuse後,並以下面的方法mount NTFS的磁區就可以work囉~
# mount /dev/hda7 /mnt/ntfs -t ntfs-3g
# vi /etc/fstab
->
ntfs-3g
只要安裝好ntfs-3g與fuse後,並以下面的方法mount NTFS的磁區就可以work囉~
# mount /dev/hda7 /mnt/ntfs -t ntfs-3g
# vi /etc/fstab
->
/dev/hda7 /mnt/ntfs ntfs-3g defaults 0 0官網:
ntfs-3g
Wednesday, August 15, 2007
Shell Script: 每日檢查硬碟的使用量,當到達90%時寄出Alert mail給root
1. 至/root/bin目錄下,新增一shell script的檔案,名為diskspace.sh,內容如下:
#!/bin/bash
df -h | grep -vE '^Filesystem|tmpfs|cdrom' | awk '{ print $5 " " $1 }' | while read output;
do
usep=$(echo $output | awk '{ print $1}' | cut -d'%' -f1 )
partition=$(echo $output | awk '{ print $2 }' )
if [ $usep -ge 90 ]; then
echo "Running out of space "$partition $usep%" on $(hostname) as on $(date)" | mail -s "Alert: Almost out of disk space $usep%" root
fi
done
2. # chmod 755 diskspace.sh
3. # crontab -e
-> 10 5 * * * /root/bin/diskspace.sh
這個範例用了grep,awk與cut指令來實作,可以見得它們有多好用了 :)
參考來源: http://www.cyberciti.biz/tips/shell-script-to-watch-the-disk-space.html
#!/bin/bash
df -h | grep -vE '^Filesystem|tmpfs|cdrom' | awk '{ print $5 " " $1 }' | while read output;
do
usep=$(echo $output | awk '{ print $1}' | cut -d'%' -f1 )
partition=$(echo $output | awk '{ print $2 }' )
if [ $usep -ge 90 ]; then
echo "Running out of space "$partition $usep%" on $(hostname) as on $(date)" | mail -s "Alert: Almost out of disk space $usep%" root
fi
done
2. # chmod 755 diskspace.sh
3. # crontab -e
-> 10 5 * * * /root/bin/diskspace.sh
這個範例用了grep,awk與cut指令來實作,可以見得它們有多好用了 :)
參考來源: http://www.cyberciti.biz/tips/shell-script-to-watch-the-disk-space.html
Thursday, August 09, 2007
Canon IXUS 850試拍
趁著這次應用展買了Canon IXUS 850,原本也很想買Sony的T100但想到了記憶卡相容性的問題,我還是選擇了Canon :p
附上一張大白(ibook)與小白(NDSL)的合照。

附上一張大白(ibook)與小白(NDSL)的合照。

Friday, August 03, 2007
Setup a mail server that enables smtp auth function
Mail Server IP address: 192.168.1.254
OS: OpenSUSE 10
Setup procedure:
1. Setup Hostname (server1.example.com)
# vi /etc/HOSTNAME
server1.example.com
# vi /etc/hosts
192.168.1.254 server1.example.com server1
2. Setup DNS Server:
# vi /etc/named.conf
# cd /var/lib/named/master
# vi example.com.zone
# chown root.named example.com.zone
# rcnamed start
# chkconfig named on
# vi /etc/resolv.conf
3. Setup Postfix mail server and enables smtp auth function:
# vi /etc/postfix/main.cf
# rcsaslauthd start
# chkconfig saslauthd on
# rcpostfix start
# chkconfig postfix on
4. Enable pop3 server:
# chkconfig qpopper on
# rcxinetd restart
5. Add user account:
# useradd -m lawrence
# passwd lawrence
-> Finished
OS: OpenSUSE 10
Setup procedure:
1. Setup Hostname (server1.example.com)
# vi /etc/HOSTNAME
server1.example.com
# vi /etc/hosts
192.168.1.254 server1.example.com server1
2. Setup DNS Server:
# vi /etc/named.conf
| Configure: |
options { # The directory statement defines the name server's working directory directory "/var/lib/named"; # Write dump and statistics file to the log subdirectory. The # pathenames are relative to the chroot jail. dump-file "/var/log/named_dump.db"; statistics-file "/var/log/named.stats"; # The forwarders record contains a list of servers to which queries # should be forwarded. Enable this line and modify the IP address to # your provider's name server. Up to three servers may be listed. #forwarders { 192.0.2.1; 192.0.2.2; }; # Enable the next entry to prefer usage of the name server declared in # the forwarders section. #forward first; # The listen-on record contains a list of local network interfaces to # listen on. Optionally the port can be specified. Default is to # listen on all interfaces found on your system. The default port is # 53. #listen-on port 53 { 127.0.0.1; }; # The listen-on-v6 record enables or disables listening on IPv6 # interfaces. Allowed values are 'any' and 'none' or a list of # addresses. listen-on-v6 { any; }; # The next three statements may be needed if a firewall stands between # the local server and the internet. #query-source address * port 53; #transfer-source * port 53; #notify-source * port 53; # The allow-query record contains a list of networks or IP addresses # to accept and deny queries from. The default is to allow queries # from all hosts. #allow-query { 127.0.0.1; }; # If notify is set to yes (default), notify messages are sent to other # name servers when the the zone data is changed. Instead of setting # a global 'notify' statement in the 'options' section, a separate # 'notify' can be added to each zone definition. notify no; }; zone "." in { type hint; file "root.hint"; }; zone "localhost" in { type master; file "localhost.zone"; }; zone "0.0.127.in-addr.arpa" in { type master; file "127.0.0.zone"; }; zone "example.com" { type master; file "master/example.com.zone"; }; |
# cd /var/lib/named/master
# vi example.com.zone
| Configure: |
$TTL 1W @ IN SOA server1.example.com. root.server1.example.com. ( 42 ; serial (d. adams) 2D ; refresh 4H ; retry 6W ; expiry 1W ) ; minimum IN NS server1 server1 IN A 192.168.1.254 |
# chown root.named example.com.zone
# rcnamed start
# chkconfig named on
# vi /etc/resolv.conf
| Configure: |
nameserver 192.168.1.254 |
3. Setup Postfix mail server and enables smtp auth function:
# vi /etc/postfix/main.cf
| Configure: |
queue_directory = /var/spool/postfix command_directory = /usr/sbin daemon_directory = /usr/lib/postfix mail_owner = postfix unknown_local_recipient_reject_code = 550 mynetworks = 127.0.0.0/8 debug_peer_level = 2 debugger_command = PATH=/bin:/usr/bin:/usr/local/bin:/usr/X11R6/bin xxgdb $daemon_directory/$process_name $process_id & sleep 5 sendmail_path = /usr/sbin/sendmail newaliases_path = /usr/bin/newaliases mailq_path = /usr/bin/mailq setgid_group = maildrop html_directory = /usr/share/doc/packages/postfix/html manpage_directory = /usr/share/man sample_directory = /usr/share/doc/packages/postfix/samples readme_directory = /usr/share/doc/packages/postfix/README_FILES inet_protocols = all biff = no mail_spool_directory = /var/mail canonical_maps = hash:/etc/postfix/canonical virtual_alias_maps = hash:/etc/postfix/virtual virtual_alias_domains = hash:/etc/postfix/virtual relocated_maps = hash:/etc/postfix/relocated transport_maps = hash:/etc/postfix/transport sender_canonical_maps = hash:/etc/postfix/sender_canonical masquerade_exceptions = root masquerade_classes = envelope_sender, header_sender, header_recipient myhostname = server1.example.com program_directory = /usr/lib/postfix inet_interfaces = all masquerade_domains = mydestination = $myhostname, localhost.$mydomain defer_transports = disable_dns_lookups = no relayhost = mailbox_command = mailbox_transport = strict_8bitmime = no disable_mime_output_conversion = no smtpd_sender_restrictions = hash:/etc/postfix/access smtpd_client_restrictions = smtpd_helo_required = no smtpd_helo_restrictions = strict_rfc821_envelopes = no smtpd_recipient_restrictions = permit_mynetworks,reject_unauth_destination smtp_sasl_auth_enable = no smtpd_sasl_auth_enable = no smtpd_use_tls = no smtp_use_tls = no alias_maps = hash:/etc/aliases mailbox_size_limit = 0 message_size_limit = 10240000 smtpd_sasl_auth_enable = yes smtpd_sasl_security_options = noanonymous broken_sasl_auth_clients = yes smtpd_recipient_restrictions = permit_sasl_authenticated,permit_mynetworks,reject_unauth_destination |
# rcsaslauthd start
# chkconfig saslauthd on
# rcpostfix start
# chkconfig postfix on
4. Enable pop3 server:
# chkconfig qpopper on
# rcxinetd restart
5. Add user account:
# useradd -m lawrence
# passwd lawrence
-> Finished
Sunday, July 29, 2007
Linux Distribution Chooser
Linux Distribution百百種,你適合那一種版本呢?嘿~現在有個網站可以幫您做個分析,帽客做完後,它推薦我用Fedora與OpenSUSE,哇!!真準呀!剛好是我最熟悉的!真好玩 :)

Linux Distribution Chooser

Linux Distribution Chooser
網路效能測試工具: iperf
最近測試的案子中,利用了一套軟體來測試網路的效能,它叫做iperf,iperf支援大多數的作業系統,如: Windows,Linux,FreeBSD,MACOSX,Solaris等等,使用上非常簡單,在你的網路環境中準備兩台電腦,各架設於兩端點間,如core switch到RD switch之間,一邊設定為iperf server,另一邊設定成iperf client,這麼一來你就可以知道core switch與RD switch之間的throughput能達到多少,它可針對TCP or UDP來做測試唷!由於命令參數挺多,所以在這邊我就不多提了,您可以至以下連結取得iperf來安裝,並參考設定範例,經過測試,iperf可以很成功的在Windows XP SP2,RHEL4/5與Ubuntu上執行。
iperf
iperf
Saturday, July 28, 2007
找RPM的好地方
以下列出帽客常去找RPM的網址:
http://rpmfind.net
http://rpm.pbone.net/
http://www.rpmseek.com/index.html
http://benjiweber.co.uk:8080/webpin/
http://rpmfind.net
http://rpm.pbone.net/
http://www.rpmseek.com/index.html
http://benjiweber.co.uk:8080/webpin/
Thursday, July 12, 2007
Crossover for Linux
今天帽客要跟大家介紹一個還不錯用的軟體,它叫做Crossover,它是一個能讓你在Linux or MAC OSX下安裝MS applcations的一套軟體。
老實說啦,很多時候迫於無耐,還是要跑跑MS的東西,比如MS office,沒辦法....大部份的公司還是用MS office,為了這樣,我只好在我的Linux下裝個MS office來用吧。
安裝Crossover,一點也不難,先至官網抓下試用版後(它是一個script file),你只要給它有x的權限後就可以安裝了,這時它會引導你一步一步完成安裝。
安裝完畢後,登出並登入X window後,你應該會在Applications選單中看見Crossover,選擇Install Windows Software,並依照它的引導,很簡單的就能安裝好一些MS下的apps,帽客在RHEL,CentOS與Ubuntu測試過都能安裝成功並執行,最後附上幾張圖給大家參考。
圖1:
圖2 Word:

圖3 Excel:

圖4 IE6.0:

老實說啦,很多時候迫於無耐,還是要跑跑MS的東西,比如MS office,沒辦法....大部份的公司還是用MS office,為了這樣,我只好在我的Linux下裝個MS office來用吧。
安裝Crossover,一點也不難,先至官網抓下試用版後(它是一個script file),你只要給它有x的權限後就可以安裝了,這時它會引導你一步一步完成安裝。
安裝完畢後,登出並登入X window後,你應該會在Applications選單中看見Crossover,選擇Install Windows Software,並依照它的引導,很簡單的就能安裝好一些MS下的apps,帽客在RHEL,CentOS與Ubuntu測試過都能安裝成功並執行,最後附上幾張圖給大家參考。
圖1:

圖2 Word:

圖3 Excel:

圖4 IE6.0:

Tuesday, July 10, 2007
Ubuntu 架設nfs server
1. Install
$ sudo apt-get install nfs-common
$ sudo apt-get install nfs-kernel-server
2. 設定 /etc/exports (For example: 將/mnt/iso share給all net使用)
$ sudo vi /etc/exports
/mnt/iso *(ro,sync)
3. 啟動 nfs server
$ sudo /etc/init.d/nfs-kernel-server start
4. 檢查
$ showmount -e localhost
成功的話應該可以看到這樣的訊息:
Export list for localhost:
/mnt/iso *
$ sudo apt-get install nfs-common
$ sudo apt-get install nfs-kernel-server
2. 設定 /etc/exports (For example: 將/mnt/iso share給all net使用)
$ sudo vi /etc/exports
/mnt/iso *(ro,sync)
3. 啟動 nfs server
$ sudo /etc/init.d/nfs-kernel-server start
4. 檢查
$ showmount -e localhost
成功的話應該可以看到這樣的訊息:
Export list for localhost:
/mnt/iso *
Sunday, July 08, 2007
Ubuntu之旅2-Install AdobeReader 7.x
Procedure:
1. 新增apt server:
1.1 加入金鑰:
$ wget -q http://medibuntu.sos-sts.com/repo/medibuntu-key.gpg -O- sudo apt-key add -
1.2 新增套件來源庫:
$ sudo vi /etc/apt/sources.list
## Medibuntu - Ubuntu 7.04 "feisty fawn" ## Please report any bug on https://launchpad.net/products/medibuntu/+bugs deb http://medibuntu.sos-sts.com/repo/ feisty free non-free deb-src http://medibuntu.sos-sts.com/repo/ feisty free non-free
2. 更新與安裝AdobeReader
$ sudo apt-get update; $ sudo apt-get install acroread
3. 新增中文套件:
3.1 download tarball file from here
3.2 解開:
$ sudo tar zxvf FontPack708_cht_i386-linux.tar.gz
3.3 安裝:
$ sudo ./install
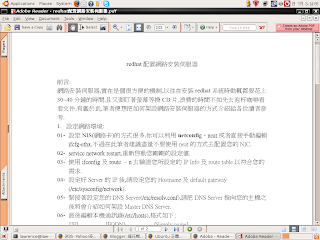
圖:
1. 新增apt server:
1.1 加入金鑰:
$ wget -q http://medibuntu.sos-sts.com/repo/medibuntu-key.gpg -O- sudo apt-key add -
1.2 新增套件來源庫:
$ sudo vi /etc/apt/sources.list
## Medibuntu - Ubuntu 7.04 "feisty fawn" ## Please report any bug on https://launchpad.net/products/medibuntu/+bugs deb http://medibuntu.sos-sts.com/repo/ feisty free non-free deb-src http://medibuntu.sos-sts.com/repo/ feisty free non-free
2. 更新與安裝AdobeReader
$ sudo apt-get update; $ sudo apt-get install acroread
3. 新增中文套件:
3.1 download tarball file from here
3.2 解開:
$ sudo tar zxvf FontPack708_cht_i386-linux.tar.gz
3.3 安裝:
$ sudo ./install
圖:

Wednesday, June 27, 2007
Ubuntu 安裝VMware Server
帽客常常透過VMware將一台電腦當兩台用,所以當然也要試著在Ubuntu上安裝看看囉,跟RHEL與SLES不一樣的是,Ubuntu不可透過rpm來安裝唷!要用tarball file與上個path之後才能順利安裝成功,至於怎麼裝,請參考這個連結: 在Ubuntu7.04上安裝vmware server
附上一張圖,有圖有真相嘛 :p

附上一張圖,有圖有真相嘛 :p

Friday, June 22, 2007
Ubuntu之旅
人家都說用Ubuntu來當Linux Desktop是很方便的選擇,於是乎帽客我也想來體驗看看,去官網抓下Desktop版的iso後,利用我那小白把它燒成CD(只要一片就好ㄟ!),放到測試的機器安裝,嗯~果然非常之簡單,一會便裝完了。
待開機完成後,用剛剛所建立的User登入,第一件事便是來裝個Beryl玩看看,呵呵~真是方便呀!利用apt來安裝真是好用呀~~ 搞定了3D桌面後,便開始安裝各種Applications。
Amule,d4x,gFTP,k3b....都很好裝,跟以往我把RHEL3當桌面,被rpm相依性問題搞爆的痛苦來比真是太美妙了,只是在安裝gcin與stardict時有點小不順,所以先po上來記一下:
-Install stardict
# sudo apt-get install stardict
預設是沒有辭典可以用的唷,這時請到stardict官網抓下辭典,解開後將檔案搬到/usr/share/stardict/dic就可以了。
-Install gcin
# sudo apt-get install gcin
# sudo apt-get install im-switch
# im-switch -s gcin
重新登入,便可使用gcin。
待開機完成後,用剛剛所建立的User登入,第一件事便是來裝個Beryl玩看看,呵呵~真是方便呀!利用apt來安裝真是好用呀~~ 搞定了3D桌面後,便開始安裝各種Applications。
Amule,d4x,gFTP,k3b....都很好裝,跟以往我把RHEL3當桌面,被rpm相依性問題搞爆的痛苦來比真是太美妙了,只是在安裝gcin與stardict時有點小不順,所以先po上來記一下:
-Install stardict
# sudo apt-get install stardict
預設是沒有辭典可以用的唷,這時請到stardict官網抓下辭典,解開後將檔案搬到/usr/share/stardict/dic就可以了。
-Install gcin
# sudo apt-get install gcin
# sudo apt-get install im-switch
# im-switch -s gcin
重新登入,便可使用gcin。
Friday, June 15, 2007
G4Fancontrol
話說,帽客的小白開機久了就會發高燒到60度上下,非常之燙手,同時對小白的壽命也會有影響,所以我都有用散熱墊來幫忙讓它的工作溫度保持在40度上下,但是當我人在外面使用時,就不想帶著散熱墊呀!所以只好讓它發高燒。
之前Intel base的Mac有出控制風扇的軟體,心想~為何PPC沒有呀!哭~~~難道PPC的使用者就沒有明天了嗎? 哭~~~~ 不過,今天讓我找到了For PPC的風扇控制軟體,哈哈!我的小白出運囉~~ 先測試看看會不會work先。
Website: G4Fancontrol
之前Intel base的Mac有出控制風扇的軟體,心想~為何PPC沒有呀!哭~~~難道PPC的使用者就沒有明天了嗎? 哭~~~~ 不過,今天讓我找到了For PPC的風扇控制軟體,哈哈!我的小白出運囉~~ 先測試看看會不會work先。
Website: G4Fancontrol
Thursday, June 07, 2007
Final Fantasy XII:歸來之翼

最近趁有空閒的時候,將NDS上的一款遊戲Final Fantasy XII:歸來之翼破關了,整個遊戲必需使用觸碰筆操作,一開始很不習慣,但玩久了還覺得蠻有趣的!
遊戲的難度不高,幾乎給它來個大軍壓境都能輕鬆獲勝,除了後面幾關之外 :p
雖然我沒玩過PS2的FF12,但這款外傳也帶給我不少樂趣!
官方網站: http://www.square-enix.co.jp/ff12rw/
Wednesday, June 06, 2007
在RHEL5架設DNS Server
RHEL5跟以往RHEL4與RHEL3在架設DNS Server時,有些不一樣,不一樣的地方在於,ㄟ~~configure file怎麼都沒看到哩,還有預設的zone files哩,怎麼都沒有呀?!要我自己產生嗎? OH MY GOD! 那有可能呀!所幸今天在高人的指點下,找到了這些檔案身在何處呀!果然是高手高手高高手呀!
01- 安裝system-config-bind這隻套件
02- 到/usr/share/system-config-bind/profiles/下就可以找到named.conf與zone files.
03- 接下來把named.conf copy到 /var/named/chroot/etc/
04- 再把zone files copy到 /var/named/chroot/var/named/
05- 最後把將 /usr/share/doc/bind-*/sample/var/named/named.root copy到/var/named/chroot/var/named/
這樣就大功告成啦!剩下的就是自己改named.conf與新增網域正反解的zone files囉!
01- 安裝system-config-bind這隻套件
02- 到/usr/share/system-config-bind/profiles/下就可以找到named.conf與zone files.
03- 接下來把named.conf copy到 /var/named/chroot/etc/
04- 再把zone files copy到 /var/named/chroot/var/named/
05- 最後把將 /usr/share/doc/bind-*/sample/var/named/named.root copy到/var/named/chroot/var/named/
這樣就大功告成啦!剩下的就是自己改named.conf與新增網域正反解的zone files囉!
Friday, June 01, 2007
Fedora 7 出了!
今天Fedora Project release Fedora 7囉!這次的版本支援i386,x86_64 and ppc,預計今晚回家download後,安裝在IBM X24上測試看看。
如果您需要更多的資訊,請參考Fedora Project的官方網站。
Fedora Project
如果您需要更多的資訊,請參考Fedora Project的官方網站。
Fedora Project
Thursday, May 31, 2007
Linux發行者大收集
Linux發行的套件到底有幾個呀?呵~這我也不知道,以下這個網站整理了目前發行者的logo與連結(看得我眼睛都花了!)。目前看起來是352個,不過應該不止吧 :p
http://www.gridter.com/linx/linux.html
http://www.gridter.com/linx/linux.html
Subscribe to:
Posts (Atom)