除了rpmfind.net之外,這是我常用來找tools的一個網站,同時它也提供許多硬體裝置的驅動程式,我的兩張無線網卡(dwl650, dwlag650)也是拜它所賜才順利裝起來,不過目前它只提供RH的rpm。
如果您也有無線網卡想在Linux下使用,不訪來找看看吧!
網址: http://atrpms.net/
Friday, July 28, 2006

Monday, July 24, 2006
Shell練習 from 鳥哥 Linux 私房菜
我想要建立三個空的檔案,檔名最開頭由使用者輸入決定,假設使用者輸入 filename 好了, 那今天的日期是 2005/08/23 ,我想要以前天、昨天、今天的日期來建立這個檔案,亦即 filename_20050821, filename_20050822, filename_20050823 ,該如何是好?
這個練習題是來自於鳥哥的網站,以下是我自己的寫法:
#!/bin/bash
echo -e "System will create 3 file automatic"
read -p "Please enter your filename: " filename
date1=`date +%Y%m%d --date="-1 day"`
date2=`date +%Y%m%d`
date3=`date +%Y%m%d --date="+1 day"`
filename1="$filename$date1"
filename2="$filename$date2"
filename3="$filename$date3"
touch $filename1
touch $filename2
touch $filename3
這個練習題是來自於鳥哥的網站,以下是我自己的寫法:
#!/bin/bash
echo -e "System will create 3 file automatic"
read -p "Please enter your filename: " filename
date1=`date +%Y%m%d --date="-1 day"`
date2=`date +%Y%m%d`
date3=`date +%Y%m%d --date="+1 day"`
filename1="$filename$date1"
filename2="$filename$date2"
filename3="$filename$date3"
touch $filename1
touch $filename2
touch $filename3
Thursday, July 20, 2006
Linux好用的軟體
介紹一下我常用的Linux軟體,好在有這麼多的免費軟體讓我可以把Linux當desktop使用。
- Xine: 多媒體撥放軟體
- beep-media-player: mp3撥放軟體 (support big5 and utf8)
- gthumb: 看圖軟體
- 星際譯王: 翻譯軟體 不比Dr. eye差唷!
- Openoffice
- gaim: 即時通軟體
- Real player: 多媒體撥放軟體
- Ethereal: 分析網路封包
- Xchm: 可以閱讀 MS chm的文件
- Amule: 不要懷疑,它就是windows的eMule
- Azureus: 就是BT囉
- AdobeReader: 是的!也有for Linux version
- Rarlinux: 讓linux也可解rar的檔案
.................當然還有很多很多的好軟體!感謝這些默默耕耘的前輩們,因為他們的付出,讓大家有這麼多的好軟體可以使用!
- Xine: 多媒體撥放軟體
- beep-media-player: mp3撥放軟體 (support big5 and utf8)
- gthumb: 看圖軟體
- 星際譯王: 翻譯軟體 不比Dr. eye差唷!
- Openoffice
- gaim: 即時通軟體
- Real player: 多媒體撥放軟體
- Ethereal: 分析網路封包
- Xchm: 可以閱讀 MS chm的文件
- Amule: 不要懷疑,它就是windows的eMule
- Azureus: 就是BT囉
- AdobeReader: 是的!也有for Linux version
- Rarlinux: 讓linux也可解rar的檔案
.................當然還有很多很多的好軟體!感謝這些默默耕耘的前輩們,因為他們的付出,讓大家有這麼多的好軟體可以使用!
Use Linux to Setup L2TP Server (without IPSec)
在此分享一下,小弟在Linux下成功架起VPN - L2TP Server 的方法,不過要注意的是並沒有實現over IPSec。
測試環境:
L2TP Server -- L2TP Client
L2TP Server:
-OS: CentOS 4.x
- L2TP package: l2tpd
- IP address: 10.10.99.100/24
L2TP Client:
- OS: Windows XP PRO
- IP address: 10.10.99.101/24
步驟:
1. Install l2tpd:
rpm -ivh l2tpd*
2. Create L2TP User:
# vi /etc/l2tpd/l2tp-secrects
l2tpuser * "password"
3. Configure L2TP configure file
# vi /etc/l2tpd/l2tpd.conf
[global]
; listen-addr = 192.168.1.98 // Allow all L2TP Client dial in
auth file = /etc/l2tpd/l2tp-secrets
[lns default]
ip range = 192.168.0.128-192.168.0.150 // L2TP Client scope
local ip = 192.168.0.254 // L2TP Server IP address
require chap = yes
refuse pap = yes
require authentication = yes
name = LinuxVPNserver
ppp debug = yes
pppoptfile = /etc/ppp/options.l2tpd
length bit = yes
4. Initial L2TP Server:
# service l2tpd start
# chkconfig --level 35 l2tpd on
5. Configure L2TP client (Windows 2000 / XP PRO)
The default Windows 2000/XP does not allow L2TP traffic without IPSec encryption. You can disable default behvior by editing the registry as follow:
- Use the registry editor (regedit) to locate the following key in the registry:
HKEY_LOCAL_MACHINE \ System \ CurrentControlSet \ Services \ Rasman \ Parameters
- Add the following registry value to this key
Value Name: ProhibitIpSec
Data Type: REG_DWORD
Value: 1
- Reboot Windows 2000/XP
6. Use Windows 2000/XP to setup L2TP client profile.
測試環境:
L2TP Server -- L2TP Client
L2TP Server:
-OS: CentOS 4.x
- L2TP package: l2tpd
- IP address: 10.10.99.100/24
L2TP Client:
- OS: Windows XP PRO
- IP address: 10.10.99.101/24
步驟:
1. Install l2tpd:
rpm -ivh l2tpd*
2. Create L2TP User:
# vi /etc/l2tpd/l2tp-secrects
l2tpuser * "password"
3. Configure L2TP configure file
# vi /etc/l2tpd/l2tpd.conf
[global]
; listen-addr = 192.168.1.98 // Allow all L2TP Client dial in
auth file = /etc/l2tpd/l2tp-secrets
[lns default]
ip range = 192.168.0.128-192.168.0.150 // L2TP Client scope
local ip = 192.168.0.254 // L2TP Server IP address
require chap = yes
refuse pap = yes
require authentication = yes
name = LinuxVPNserver
ppp debug = yes
pppoptfile = /etc/ppp/options.l2tpd
length bit = yes
4. Initial L2TP Server:
# service l2tpd start
# chkconfig --level 35 l2tpd on
5. Configure L2TP client (Windows 2000 / XP PRO)
The default Windows 2000/XP does not allow L2TP traffic without IPSec encryption. You can disable default behvior by editing the registry as follow:
- Use the registry editor (regedit) to locate the following key in the registry:
HKEY_LOCAL_MACHINE \ System \ CurrentControlSet \ Services \ Rasman \ Parameters
- Add the following registry value to this key
Value Name: ProhibitIpSec
Data Type: REG_DWORD
Value: 1
- Reboot Windows 2000/XP
6. Use Windows 2000/XP to setup L2TP client profile.
Thursday, July 13, 2006
VMware Server免費開放下載

這真是個好消息,VMware Server現在開放免費下載,當下載完畢後,在到官方網站申請序號即可!目前只支援Linux與Windows的平台,未來不知是否會支援MAC OSX。
VMware Server 1.0下載處:
http://www.vmware.com/products/server/
Friday, July 07, 2006
Rsync遠端備份+SSH免密碼登入
上次介紹過利用Rsync做遠端備份資料用,發覺美中不足的地方是,要輸入密碼後才能登入遠端Server,然後才能執行備份的動作,稍嫌麻煩,故利用了SSH免密碼登入的方式,果然方便了很多,現在寫了一個備份的 shell script,備份資料對我來說是輕鬆了許多。
Monday, July 03, 2006
crontab練習題
需求: 每30分鐘,記錄系統記憶體的使用狀況,並存入/var/log/Year-Month-Day.log;每天早上8:00將昨天的記憶體記錄檔mail給root.
解答:
1.先寫個收集記憶體使用狀況的shell script:
# cd ~root/bin
# vi collect.sh
#!/bin/bash
FILE=/var/log/`date +%Y-%m-%d`.log
date >> $FILE
free >> $FILE
echo >> $FILE
# chmod 755 collect.sh -v
2. # crontab -e
*/30 * * * * /root/bin/collect.sh
3. 撰寫每日發信給root的shell script:
# cd ~root/bin
# vi sendinfo.sh
#!/bin/bash
FILE=/var/log/`date +%Y-%m-%d --date="-1 day"`.log
echo "This is memory info" | mutt -s "Memory info" -a $FILE root
# chmod 755 sendinfo.sh -v
4. # crontab -e
0 8 * * * /root/bin/sendinfo.sh
解答:
1.先寫個收集記憶體使用狀況的shell script:
# cd ~root/bin
# vi collect.sh
#!/bin/bash
FILE=/var/log/`date +%Y-%m-%d`.log
date >> $FILE
free >> $FILE
echo >> $FILE
# chmod 755 collect.sh -v
2. # crontab -e
*/30 * * * * /root/bin/collect.sh
3. 撰寫每日發信給root的shell script:
# cd ~root/bin
# vi sendinfo.sh
#!/bin/bash
FILE=/var/log/`date +%Y-%m-%d --date="-1 day"`.log
echo "This is memory info" | mutt -s "Memory info" -a $FILE root
# chmod 755 sendinfo.sh -v
4. # crontab -e
0 8 * * * /root/bin/sendinfo.sh
Friday, June 30, 2006

Wednesday, June 28, 2006
Mac OSX 10.4.7 update info
推薦所有使用者使用“10.4.7 更新”,它包含了一般的作業系統修正,以及對以下應用程式和技術的特定修正。它包含以下修正:
- 防止發生 AFP 死結和連線斷開的情形
- 將 Adobe 和 Quark 文件儲存到 AFP 裝載的卷宗
- Bluetooth 檔案傳送、配對和連接 Bluetooth 滑鼠,以及同步至行動電話
- QuickTime、iTunes、Final Cut Pro 和 Soundtrack 應用程式中的音訊播放功能
- 當在桌面上檢視圖像時,確保圖像的間隔距離正確
- 判斷燒錄檔案夾所需的空間
- iChat 音訊和視訊連線,以及使用 AIM 建立聊天室
- 將檔案輸入到 Keynote 3
- 當使用 iCal 和 iPhoto 時的 PDF 工作流程
- 可靠地使用工作流程中的 Automator 動作
- 在“字體簿”中輸入和移除字體
- 同步位址、書籤、行事曆事件和檔案至 .Mac
- 與協力廠商應用程式和裝置的相容性
- 之前獨立的安全更新項目
如需關於此“更新”的詳細資訊,請參訪此網站:http://www.info.apple.com/kbnum/n303771-yh。
如需關於“安全更新”的詳細資訊,請參訪此網站:http://www.info.apple.com/kbnum/n61798-yh。
- 防止發生 AFP 死結和連線斷開的情形
- 將 Adobe 和 Quark 文件儲存到 AFP 裝載的卷宗
- Bluetooth 檔案傳送、配對和連接 Bluetooth 滑鼠,以及同步至行動電話
- QuickTime、iTunes、Final Cut Pro 和 Soundtrack 應用程式中的音訊播放功能
- 當在桌面上檢視圖像時,確保圖像的間隔距離正確
- 判斷燒錄檔案夾所需的空間
- iChat 音訊和視訊連線,以及使用 AIM 建立聊天室
- 將檔案輸入到 Keynote 3
- 當使用 iCal 和 iPhoto 時的 PDF 工作流程
- 可靠地使用工作流程中的 Automator 動作
- 在“字體簿”中輸入和移除字體
- 同步位址、書籤、行事曆事件和檔案至 .Mac
- 與協力廠商應用程式和裝置的相容性
- 之前獨立的安全更新項目
如需關於此“更新”的詳細資訊,請參訪此網站:http://www.info.apple.com/kbnum/n303771-yh。
如需關於“安全更新”的詳細資訊,請參訪此網站:http://www.info.apple.com/kbnum/n61798-yh。
Monday, June 26, 2006
在ibook G4安裝FC5,並驅動wireless card
Setup procedure:
1. Upgrade kernel to version: 2.6.17-1.2139_FC5 by yum.
2. Install bcm43xx-fwcutter by yum.
3. To use the bcm43xx driver which is part of the Fedora kernel, you need to extract the firmware which is part of the official MacOS, Windows, or Linux drivers.
4. Reboot ibook and boot it from Mac OSX.
5. Copy /System/Library/Extensions/AppleAirPort2.kext/Contents/MacOS/AppleAirPort2
6. Back to FC5
7. bcm43xx-fwcutter -w /lib/firmware AppleAirPort2
8. Because the bcm43xx driver is new and experimental, it is not configured to be automatically loaded in the Fedora Core 5 kernel. In order to ensure that the driver is loaded, you may need to copy the 'modprobe.bcm43xx' file into the /etc/modprobe.d directory.
9. Reboot ibook.
1. Upgrade kernel to version: 2.6.17-1.2139_FC5 by yum.
2. Install bcm43xx-fwcutter by yum.
3. To use the bcm43xx driver which is part of the Fedora kernel, you need to extract the firmware which is part of the official MacOS, Windows, or Linux drivers.
4. Reboot ibook and boot it from Mac OSX.
5. Copy /System/Library/Extensions/AppleAirPort2.kext/Contents/MacOS/AppleAirPort2
6. Back to FC5
7. bcm43xx-fwcutter -w /lib/firmware AppleAirPort2
8. Because the bcm43xx driver is new and experimental, it is not configured to be automatically loaded in the Fedora Core 5 kernel. In order to ensure that the driver is loaded, you may need to copy the 'modprobe.bcm43xx' file into the /etc/modprobe.d directory.
9. Reboot ibook.
Thursday, June 22, 2006
利用Linux架設PPPoE Server
01- Edit pppoe-server-options as following:
require-pap
require-chap
login
lcp-echo-interval 10
lcp-echo-failure 2
ms-dns 168.95.1.1
02- Edit pap-secrets as following:
Client Server Secret IP address
"username" * "password" *
PS 此User必需存在於本機的account
03- Edit chap-secrets as following:
Client Server Secret IP address
"username" * "password" *
PS 此User必需存在於本機的account
04- Command:
pppoe-server -I eth0 -L 220.10.30.254 -R 220.10.30.1 &
Packages must be install:
ppp-*
rp-pppoe-*
require-pap
require-chap
login
lcp-echo-interval 10
lcp-echo-failure 2
ms-dns 168.95.1.1
02- Edit pap-secrets as following:
Client Server Secret IP address
"username" * "password" *
PS 此User必需存在於本機的account
03- Edit chap-secrets as following:
Client Server Secret IP address
"username" * "password" *
PS 此User必需存在於本機的account
04- Command:
pppoe-server -I eth0 -L 220.10.30.254 -R 220.10.30.1 &
Packages must be install:
ppp-*
rp-pppoe-*
Tuesday, June 20, 2006
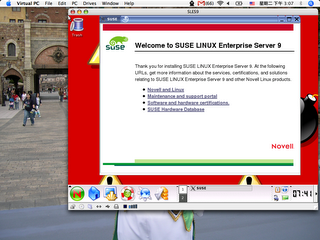
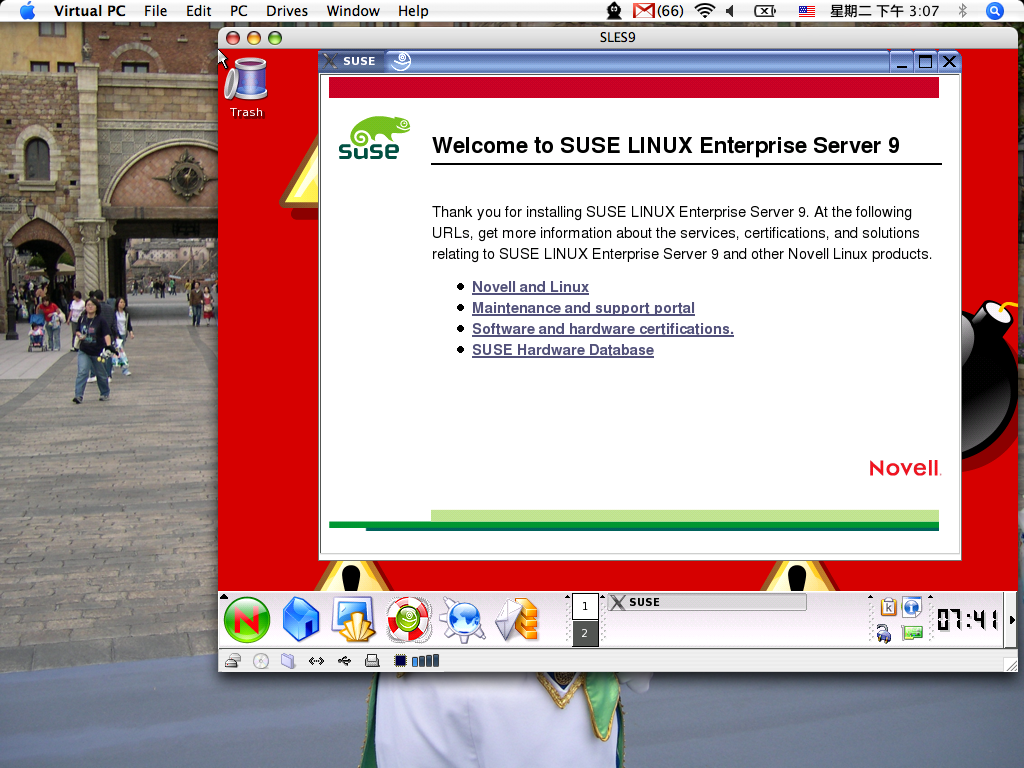
Install SLES9 on Mac OS by Virtual PC successfully!
終於在Mac OSX下,利用MS Virtual PC成功安裝好了SLES9,目前跑起來還沒有發現任何的問題,只是感覺跑起來有點慢,但至少可以用小白來練習SLES9.
接下來比對一下我在Vmware中常用的功能,Virtual PC是否也有?
1. Bridged to the physical network -> Virtual Switch
2. NAT -> Shared Networking
3. Snapshot -> Undo drives (default: disable), 當直接把Guest OS關掉時,它會幫你save目前Guest OS的狀態,如果你不想儲存此次狀態,是可以discard的,缺點是必須重新reboot OS,這有點花時間.
基本上,我只在virtual console下操作SLES9,所速度上還可接受,但....如果要進入到X window的環境的話......可是要等上一些時間喔! 這時想到尤達大師常對安納金說:[要有耐心.] 嗯嗯!是的要有耐心,不能掉入氣的黑暗面!
接下來比對一下我在Vmware中常用的功能,Virtual PC是否也有?
1. Bridged to the physical network -> Virtual Switch
2. NAT -> Shared Networking
3. Snapshot -> Undo drives (default: disable), 當直接把Guest OS關掉時,它會幫你save目前Guest OS的狀態,如果你不想儲存此次狀態,是可以discard的,缺點是必須重新reboot OS,這有點花時間.
基本上,我只在virtual console下操作SLES9,所速度上還可接受,但....如果要進入到X window的環境的話......可是要等上一些時間喔! 這時想到尤達大師常對安納金說:[要有耐心.] 嗯嗯!是的要有耐心,不能掉入氣的黑暗面!
Friday, June 16, 2006

Thursday, June 15, 2006
利用MintDNS架起DDNS Server
上次所介紹的DDNS Server是使用TSIG的方式,提供DDNS的服務,但萬一您的需求是要用username/password做認證用呢? 有一套很好的軟體叫作MintDNS可以提供這樣的需求! 安裝過程有點複雜,不過照著安裝手冊慢慢去做的話,應該是沒有問題,寫得算詳細,缺點是圖少了點 呵~ 架設完畢後,還可以利用它的DDNS client來驗證功能是否正常,這樣一來我就可以提供測試環境給RD了~呼呼,以下是它的官方網站:
MintDNS
MintDNS
Tuesday, June 13, 2006
Use Bind9 to setup DDNS Server
Primary DNS Server:
1. 利用host查詢mail.example.com所對應的IP address.

2. 在Primary DNS Server產生TSIG供client端使用.

3. 檢查是否成功新增以下兩個檔案.

4. 查看key的內容.

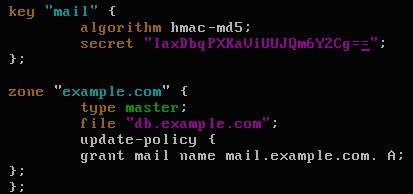
5. 修改/etc/named.conf的內容如下,這樣一來擁有key的client將可以update mail.example.com這筆RR.
6. 重新啟動named.
7. 利用scp將步驟3所產生的兩個檔案copy到client端. (兩個檔案必須在同一目錄下)
DNS client:
1. 在client端執行以下的命令,來更新RR.

2. 重新查詢mail.example.com,檢查是否更新成功.

Note: 如果不能更新成功,請檢查相關目錄的權限是否設定正確.
1. 利用host查詢mail.example.com所對應的IP address.

2. 在Primary DNS Server產生TSIG供client端使用.

3. 檢查是否成功新增以下兩個檔案.

4. 查看key的內容.

5. 修改/etc/named.conf的內容如下,這樣一來擁有key的client將可以update mail.example.com這筆RR.

6. 重新啟動named.
7. 利用scp將步驟3所產生的兩個檔案copy到client端. (兩個檔案必須在同一目錄下)
DNS client:
1. 在client端執行以下的命令,來更新RR.

2. 重新查詢mail.example.com,檢查是否更新成功.

Note: 如果不能更新成功,請檢查相關目錄的權限是否設定正確.
Monday, June 12, 2006
Setup DDNS Server via CentOS
今天利用bind9來架設DDNS,參考鳥哥的網站,一步一步去做.....竟然failed.....檢查了好久,才發現我的selinux status是enable的?! 奇怪...我並不記得我有enable selinux呀........
不過總算是能work了,可是這種方法是先產生一組key來做驗證用,而不是使用username/password的方式來驗證,看來我還要找看看有沒有利用帳號與密碼的方式來加以驗證,您可以至以下的網址了解到架設DNS與DDNS的方法,感謝鳥哥大大的分享.
鳥哥的私房菜
不過總算是能work了,可是這種方法是先產生一組key來做驗證用,而不是使用username/password的方式來驗證,看來我還要找看看有沒有利用帳號與密碼的方式來加以驗證,您可以至以下的網址了解到架設DNS與DDNS的方法,感謝鳥哥大大的分享.
鳥哥的私房菜
日本東京五日遊
0607-0611這段時間跟著老婆的公司到日本東京玩五天,去過日本這麼多次,這一次的飯店跟前幾次比較起來真的住得不錯! (有住到喜來登與新高輪王子飯店) 吃的方面就還可以囉~~ 行程方面我到很喜歡,因為參觀的地方不多,所以行程就不太趕,這樣一來讓我可以慢慢地去欣賞每個景點的風景,我是比較喜歡這樣的安排 =)
每次去日本都有不同的感覺,日本年年都在進步...反觀台灣....真的需要加油囉!
Note: 拍了許多照片,等整理好了在po上來.
每次去日本都有不同的感覺,日本年年都在進步...反觀台灣....真的需要加油囉!
Note: 拍了許多照片,等整理好了在po上來.
Monday, June 05, 2006
Lenovo宣佈將不會支援Linux
"CRN reports that Lenovo will not install or support the Linux operating system on any of its PCs. Lenovo is positioning itself as an exclusive partner of Microsoft, several weeks after the companies announced they were 'reaffirming' global market development and cooperation agreements."
出處: http://hardware.slashdot.org/
心情真是蠻震憾的! 因為家裡的PC與NB都是IBM的居多!
且對於Linux的support真的是不錯,以我的IBM X24來說,安裝CentOS 4.0到今一年多了,一點問題都沒有,當初考RHCE還瘋狂的用它練習安裝RHEL 3不下30次吧! 而DT裝Linux也有兩年之久了.......看來以後買Lenovo的機會是...很小....很小.....
出處: http://hardware.slashdot.org/
心情真是蠻震憾的! 因為家裡的PC與NB都是IBM的居多!
且對於Linux的support真的是不錯,以我的IBM X24來說,安裝CentOS 4.0到今一年多了,一點問題都沒有,當初考RHCE還瘋狂的用它練習安裝RHEL 3不下30次吧! 而DT裝Linux也有兩年之久了.......看來以後買Lenovo的機會是...很小....很小.....
設定SUSE Linux的vim
使用慣FC or RHEL Linux的使用者,初使用SUSE Linux的vim,一定會覺得非常不習慣,下面的設定步驟對您應該有一定的幫助:
vi /etc/vimrc
set bs=2 # SUSE預設值是不允許使用backspace,bs=2可讓vim允許使用Backspace.
syntax on # 讓vim具有顏色顯示的功能.
set hlsearch # 將搜尋的字串反白.
Note: 如果嫌麻煩的話,不如把FC or RHEL的vimrc copy到SUSE Linux,一樣是可以用的.
vi /etc/vimrc
set bs=2 # SUSE預設值是不允許使用backspace,bs=2可讓vim允許使用Backspace.
syntax on # 讓vim具有顏色顯示的功能.
set hlsearch # 將搜尋的字串反白.
Note: 如果嫌麻煩的話,不如把FC or RHEL的vimrc copy到SUSE Linux,一樣是可以用的.
Friday, June 02, 2006
開始準備考NCLP
是的,這是我的年度計劃,考取NCLP,自從在2004/08/22考取到RHCE後,就沒在去考別的認證了.
考認證對我來說是自我實力的測試,加不加薪到無所謂(假的!誰不愛錢呀!)
老婆問我,為何要去考? 不是有RHCE了嗎? 浪費錢跟時間,不如好好來陪我!
唉! 老婆大人,人活著一定要有目標,不然就跟行屍走肉一般!
廢話不多寫了,總而言之,希望年底我可以多加一張Linux認證! 呼呼~~
考認證對我來說是自我實力的測試,加不加薪到無所謂(假的!誰不愛錢呀!)
老婆問我,為何要去考? 不是有RHCE了嗎? 浪費錢跟時間,不如好好來陪我!
唉! 老婆大人,人活著一定要有目標,不然就跟行屍走肉一般!
廢話不多寫了,總而言之,希望年底我可以多加一張Linux認證! 呼呼~~
Subscribe to:
Posts (Atom)