Hi, I'm back. It's been a long time since the last update. I'm curious, is anyone still reading the blog now? Very curious. :)
Friday, March 29, 2024
Wednesday, August 19, 2020
利用nmcli連接802.1X wlan
由於公司內部實在太多AP跟SSID了,在UC18 GNOME的環境一開NetworkManager scan wifi就會整個hang住,稍微研究了一下怎麼用nmcli的方式連上一個802.1X WLAN。
$ nmcli con add type wifi ifname <wifi interface> con-name <connection_profile> ssid <SSID>
$ nmcli connection edit id <connection_profile>
nmcli> set ipv4.method auto
nmcli> set 802-1x.eap peap
nmcli> set 802-1x.phase2-auth mschapv2
nmcli> set 802-1x.identity USERNAME
nmcli> set 802-1x.password PASSWORD
nmcli> set wifi-sec.key-mgmt wpa-eap
nmcli> save
nmcli> activate
搞定,收工。
Tuesday, June 23, 2020
關於Canonical的Multipass
Multipass可以幫助Linux user快速架設起一個虛擬機器來做測試用,它類似VMWare, KVM, VirtualBox這些虛擬機器的技術,不過確有著docker的使用經驗。一個命令就可以讓user無痛叫起一台虛擬機器來使用,以下列出我常使用的命令。
1. 安裝Multipass:
$ snap install multipass --classic
2. 查詢有哪些image可以使用?
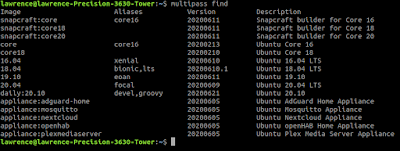
$ multipass find
3. 新增虛擬機器:
$ multipass launch 20.04

以上可以看到我的系統剛剛新增了一台Ubuntu 20.04 LTS的機器(appealing-escolar),而且已經啟動了。
4. 進入虛擬機器的shell
$ multipass shell appealing-escolar


5.傳檔案給指定的虛擬機器:
$ multipass transfer testfile shipshape-bat:

更多指令與功能請參考 --help
$ multipass --help

1. 安裝Multipass:
$ snap install multipass --classic
2. 查詢有哪些image可以使用?
$ multipass find

3. 新增虛擬機器:
$ multipass launch 20.04

以上可以看到我的系統剛剛新增了一台Ubuntu 20.04 LTS的機器(appealing-escolar),而且已經啟動了。
4. 進入虛擬機器的shell
$ multipass shell appealing-escolar


5.傳檔案給指定的虛擬機器:
$ multipass transfer testfile shipshape-bat:

更多指令與功能請參考 --help
$ multipass --help

Wednesday, March 11, 2020
How can I setup a snmptrap receiver server on Ubuntu Server 18.04?
之前有介紹過如何在Ubuntu Server 18.04建立一個SNMP agent讓SNMP Manager可以做get request的動作,請參考此篇: How can I setup a SNMP server on Ubuntu Server 18.04
現在來補足一下如何在Ubuntu Server 18.04實作snmptrap receiver server.
Step1. 安裝snmptrapd
$ sudo apt install snmptrapd
Step2. 配置snmptrpad可以接收agent送過來的event
$ vi /etc/snmp/snmptrapd.conf
authCommunity log,execute,net public
以上,我只開啟IPv4 + snmp version 2c
Step3. 重啟snmptrapd
$ sudo systemctl restart snmptrapd
Step4. 檢查port 162 active (UDP port 162是snmptrap, 161是snmp get,getnext,set)
$ sudo netstat -tupln | grep 162
udp 0 0 0.0.0.0:162 0.0.0.0:* 2100/snmptrapd
Step5. 遠端送出一個snmptrap的event
這裡我用CentOS8安裝Net-SNMP的基本工具snmptrap後,送出一個snmptrap example command.Step6. 檢查Ubuntu Server 18.04有沒有收到此event?# snmptrap -d -v 2c -c public 192.168.1.151 "" UCD-SNMP-MIB::ucdStart message s "/ disk utilization exceed 90%"
$ sudo tail -f /var/log/syslog | grep snmptrapMar 11 16:07:06 us18 snmptrapd[2100]: 2020-03-11 16:07:06[UDP: [192.168.1.132]:51067->[192.168.1.151]:162]:#012iso.3.6.1.2.1.1.3.0 = Timeticks: (194731) 0:32:27.31#011iso.3.6.1.6.3.1.1.4.1.0 = OID: iso.3.6.1.4.1.2021.251.1#011iso.3.6.1.4.1.2021.10.1.101 = STRING: "/ disk utilization exceed 90%"
That's all!
如何讓Virtualbox下的虛擬機器透過實際無線網卡取得IP? (透通模式)
先稍微提一下會想這樣做的原因是因為愈來愈多的laptop已經不提供Etherenet port,尤其是一些比較強調輕量級的laptop,所以如果不買USB or USB Type-C轉Ethernet port的話,基本上只能透過wireless interface去連接網路。
對於一般的user來說這沒什麼大不了,所謂人人家裡都有wifi(沒有的話快去買一台Ruckus AP),但就算真的沒有wifi好了,user也可以透過手機開熱點讓laptop來連上網路。
但是對於我們這些常常需要跑VM的engineer來說是有一點困擾,因為預設上就算你設定好虛擬機器的網卡bridge到實際的wireless NIC,你還是拿不到IP address.... (至少我遇到的狀況是這樣),當然這時候可以透過NAT mode讓虛擬機器的網卡可以連上網路,但是有時候透通模式才是我們需要的。
怎麼解決呢?其實非常簡單,就是把你真實wireless NIC的MAC address設定到虛擬機器的MAC address就好了,以下我用VirtualBox在Ubuntu 18.04.4 LTS來演練一下:
Step1. 取得真實wireless NIC的MAC address:

Step2. 開啟VirtualBox -> 選擇虛擬機器 -> Settings -> Network -> Advanced -> MAC address

以上填入Step1列出的MAC address.
Step3. 開機或重新啟動虛擬機器

看到了嗎? 虛擬機器內的網卡已經透過實體的wireless NIC取得IP address並且可以連上Internet.
再來用實體機器來ping一下虛擬機器:

可以開始快樂的使用了,這個小技巧希望對大家有幫助。
Friday, February 21, 2020
Turn on wireless monitor mode to capture wireless packets in Ubuntu
Wireshark在預設上是不能正確顯示無線網路的封包格式,所以如果你直接抓取wifi interface只會看到ethernet的訊框而不是802.11相關的格式。
那怎麼做呢?其實只要把wifi interface轉成monitor mode就可以了,以下嘗試在Ubuntu desktop底下實作看看:
Step1. 針對wifi NIC(wlan0)新增一個對應的monitor interface(mon0):
Step2. 啟動mon0 interface:
那怎麼做呢?其實只要把wifi interface轉成monitor mode就可以了,以下嘗試在Ubuntu desktop底下實作看看:
Step1. 針對wifi NIC(wlan0)新增一個對應的monitor interface(mon0):
$ sudo iw dev wlan0 interface add mon0 type monitor
Step2. 啟動mon0 interface:
$ sudo ifconfig mon0 up之後去啟動wireshark就會看到mon0 interface並透過它來抓802.11的封包了。
How can I setup a SNMP server on Ubuntu Server 18.04
在這篇短文中,紀錄一下如何在Ubuntu Server 18.04配置一台SNMP server同時支援snmpv2與v3,之後若有機會在補齊如何收遠端機器所發出來的snmp trap event。
Step1. 安裝:
Step2. 配置snmpd.conf:
Step3. 重啟snmpd
Step4. 測試 SNMP v2與v3 lookup:
Note: 以上由於我都是在本機測試,所以IP為127.0.0.1
Step1. 安裝:
$ sudo apt update
$ sudo apt install snmp snmpd snmp-mibs-downloader
Step2. 配置snmpd.conf:
$ sudo vi /etc/snmp/snmpd.conf
# 允許all net來連線 (IPv4+IPv6)
agentAddress udp:161,udp6:[::1]:161
# SNMP v2:
rocommunity public default -V systemonly
# SNMP v3:
createUser ubuntu MD5 1234567890
rouser ubuntu
$ sudo systemctl restart snmpd
Step4. 測試 SNMP v2與v3 lookup:
# SNMP v2
$ snmpwalk -v 2c -c public 127.0.0.1
# SNMP v3:
$ snmpwalk -v 3 -a MD5 -A 1234567890 -u ubuntu -l auth 127.0.0.1
Note: 以上由於我都是在本機測試,所以IP為127.0.0.1
Wednesday, February 19, 2020
How can I setup a DNS server on Ubuntu Server 18.04
以前都在紅帽圈設定與架設DNS server,今天筆記一下如何在Ubuntu Server安裝與架設一個master DNS server。
Step1. 安裝DNS server
$ sudo apt install bind9
Step2. 新增Zone
$ cd /etc/bind9
$ sudo vi zones.example.com
zone "example.com" {
type master;
file "/etc/bind/db.example.com";
};
Step3. 將新增的Zone加入到DNS server
$ sudo vi named.conf.local
include "/etc/bind/zones.example.com";
Step4. 建立zone file
$ sudo vi db.example.com
$TTL 86400
@ IN SOA server1.example.com. root.server1.example.com. (
1 ; Serial
86400 ; Refresh
3600 ; Retry
2419200 ; Expire
84600 ) ; Negative Cache TTL
IN A 10.10.10.253
IN NS server1.example.com.
server1 IN A 10.10.10.253
x1 IN A 10.10.10.100
Step5. 重新啟動DNS server
$ sudo systemctl restart bind9
以下開始來測試囉!
Step1. 將DNS指向localhost
$ sudo vi /etc/netplan/50-cloud-init.yaml
network:
ethernets:
enp0s3:
dhcp4: true
nameservers:
addresses: [127.0.0.1, 168.95.1.1]
version: 2
$ sudo netplan apply
Step2. 來個正解查詢:
$ host server1.example.com
server1.example.com has address 10.10.10.253
Friday, January 17, 2020
How can I check DNS server on Ubuntu? (systemd based)
玩過SysV的朋友們,古早時期應該都會去看/etc/resolv.conf來查看目前機器所使用的DNS Server,不過這招在systemd架構下已經不管用了,取而代之的是透過以下的command來確定自己目前所使用的DNS server是哪一個IP。
$ sudo systemd-resolve --status | grep 'DNS Servers'
在此簡單紀錄一下。
$ sudo systemd-resolve --status | grep 'DNS Servers'
在此簡單紀錄一下。
Subscribe to:
Posts (Atom)